![]()
![]()

![]()
![]()

Scalable computing with Dask
![]()

Description
Dask is a flexible library to perform parallel computing Data Science tasks in Python. Although multiple parallel and distributed computing libraries already exist in Python, Dask remains Pythonic while being very efficient (see Diagnosing Performance).
Dask is composed of two parts:
- Dynamic task scheduling: Optimized computational workloads (see distributed dask)
- Big Data collections: Parallel and distributed equivalent data collecting extending Numpy array, Pandas dataframes
An interesting feature of Dask is Python iterators for large-than-memory or distributed environments. Dask tries to provide different qualities:
-
Familiar: Provides parallelized NumPy array and Pandas DataFrame objects
-
Flexible: Provides a task scheduling interface for more custom workloads and integration with other projects.
-
Native: Enables distributed computing in pure Python with access to the PyData stack.
-
Fast: Operates with low overhead, low latency, and minimal serialization necessary for fast numerical algorithms
-
Scales up: Runs resiliently on clusters with 1000s of cores
-
Scales down: Trivial to set up and run on a laptop in a single process
-
Responsive: Designed with interactive computing in mind, it provides rapid feedback and diagnostics to aid humans

Task graphs
Dask solely rely on a graphs representation to encode algorithms. The main advantage of these structures is a clear and efficient approach for task scheduling. For Dask users, task graphs and operations are fully transparent unless you decide to develop a new module.
| Code | Task graph |
|---|---|
|
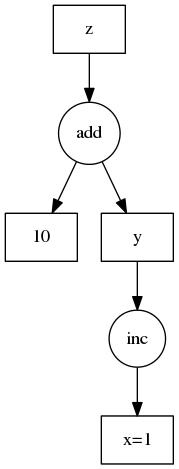
|
Install Dask
Dask can be installed with pip or conda like any other python package.
Anaconda/Conda
conda install dask
# OR
conda install dask-core # Use it if you need a minimal version of dask
Please note that Dask is already included by default in the Anaconda distribution.
Pip
In order to install all dependencies (e.g. NumPy, Pandas, ...), use the following command:
python -m pip install "dask[complete]"
# OR simply
pip install "dask[complete]"
Similarly to conda, dask core can be install with the command pip install dask. Note that additionnal modules like dask.array, dask.dataframe could be separately installed. However we strongly recommend to proceed with a full installation.
pip install "dask[array]"       # Install requirements for dask array
pip install "dask[dataframe]"   # Install requirements for dask dataframe
pip install "dask[diagnostics]" # Install requirements for dask diagnostics
pip install "dask[distributed]" # Install requirements for distributed dask
Install from sources
For those wishing to compile and optimize the library on a dedicated hardware, Dask can be compiled and installed as follows:
git clone https://github.com/dask/dask.git
cd dask
python -m pip install .
# OR
pip install ".[complete]"
On the ULHPC platform
We strongly recommend to install Dask inside a virtual environment using the python versions included in the software set.
# See https://hpc-docs.uni.lu/connect/ssh/
ssh [aion,iris]-cluster    # assuming proper configuration
# Once on the clusters, ask for a interactive job
si --time=01:00:00 # OR si-gpu --time=01:00:00 if a GPU is needed
module load lang/Python # Load default python
python -m venv dask_env_${ULHPC_CLUSTER}
source dask_env_${ULHPC_CLUSTER}/bin/activate
pip install --upgrade pip
pip install "dask[complete]"
Setup
Dask can be used on different hardware going from your laptop to a multi-node cluster. For this purpose, Dask considers two families of task schedulers. By default, if no client is instantiated, Dask will turn on the local schedule.
import dask.dataframe as dd
df = dd.read_csv(...)
df.x.sum().compute()  # This uses the single-machine scheduler by default
If you need more resources, dask.distributed will be needed to setup and connect to a distributed cluster.
from dask.distributed import Client
client = Client(...)  # Connect to distributed cluster and override default
df.x.sum().compute()  # This now runs on the distributed system
Setting a Dask cluster
In the remainder of this paper, we will only consider Distributed Dask cluster. Nevertheless, you can also consider a local cluster on your laptop to test your workflow at small scale. More details can be found in the dask.distributed documentation.
On the ULHPC platform, you have two strategies to create a Dask cluster:
- Using
SLURMClusterclass - Starting manually the dask-scheduler and dask-workers
First, we are going to setup a python virtual environment in order to install all required python libraries.
Be sure to start with a bare environment:
- No interactive job running and thus no loaded modules
- No python virtualenv already loaded
Apply the following commands to setup your environment.
# Clone tutorial repository
git clone https://github.com/ULHPC/tutorials.git
# cd into the scripts folder
cd tutorials/python/advanced/dask-ml/scripts
# Ask an interactive job
si --time=01:00:00
# Load python3 module (load by default Python3)
module load lang/Python
python -m venv dask_env_${ULHPC_CLUSTER}
source dask_env_${ULHPC_CLUSTER}/bin/activate
pip install --upgrade pip
pip install -r requirements.txt
Automatic setup
We first create a generic launcher cluster_jobs_workers.sh. Be carefull, you will need to install two different virtualenv if you planned to run the code on both clusters, i.e., Aion and Iris.
#!/bin/bash -l

#SBATCH -p batch
#SBATCH -J DASK_jobs_workers
#SBATCH --nodes=1
#SBATCH --ntasks-per-node=1
#SBATCH --cpus-per-task=1
#SBATCH -t 00:30:00

# Load the python version used to install Dask
module load lang/Python

# Make sure that you have an virtualenv dask_env installed
export DASK_VENV="$1"
shift
if [ ! -d "${DASK_VENV}" ] || [ ! -f "${DASK_VENV}/bin/activate" ]; then

    echo "Error with virtualenv" && exit 1

fi

# Source the python env
source "${DASK_VENV}/bin/activate"

python -u $*
Below a small example to start workers as slurm jobs: cluster_jobs_workers.py.
from dask_jobqueue import SLURMCluster
from dask.distributed import Client
import dask
# Library to generate plots
import matplotlib as mpl
# Define Agg as Backend for matplotlib when no X server is running
mpl.use('Agg')
import matplotlib.pyplot as plt
import socket
import os

# Submit workers as slurm job
# Below we define the slurm parameters of a single worker
cluster = SLURMCluster(cores=os.environ.get("SLURM_CPUS_PER_TASK",1),
                       processes=1,
                       memory="4GB",
                       walltime="01:00:00",
                       queue="batch",
                       interface="ib0")

numworkers = os.environ("SLURM_NTASKS",1)
cluster.scale(numworkers)

# Connect to distributed cluster and override default
client = Client(cluster)
client.wait_for_workers()

# Decorator
@dask.delayed
def inc(x):
    return x + 1

@dask.delayed
def double(x):
    return x * 2

@dask.delayed
def add(x, y):
    return x + y

data = [1, 2, 3, 4, 5]

output = []
for x in data:
    a = inc(x)
    b = double(x)
    c = add(a, b)
    output.append(c)

# Second approach as a delayed function
total = dask.delayed(sum)(output)
total.visualize(filename='task_graph.svg')
# parallel execution workers
results = total.compute()
print(results)
#### Very important ############
cluster.close()
The Dask delayed function decorates your functions so that they operate lazily. Rather than executing your function immediately, it will defer execution, placing the function and its arguments into a task graph.

You can execute the previous example with the following command: sbatch cluster_jobs_workers.sh dask_env_${ULHPC_CLUSTER} cluster_jobs_workers.py. Once the main job has started, you should see dask-workers spanning in the queue using squeue -u user.
Please note also that each worker has his own slurm-jobid.out file which provide all necessary information to diagnose problems. An example is provided below.
distributed.nanny - INFO -         Start Nanny at: 'tcp://172.19.6.19:44324'
distributed.worker - INFO -       Start worker at:    tcp://172.19.6.19:37538
distributed.worker - INFO -          Listening to:    tcp://172.19.6.19:37538
distributed.worker - INFO -          dashboard at:          172.19.6.19:39535
distributed.worker - INFO - Waiting to connect to:    tcp://172.19.6.19:39227
distributed.worker - INFO - -------------------------------------------------
distributed.worker - INFO -               Threads:                          1
distributed.worker - INFO -                Memory:                   3.73 GiB
distributed.worker - INFO -       Local Directory: /mnt/irisgpfs/users/ekieffer/Dask/dask-worker-space/worker-p1ij_9ar
distributed.worker - INFO - -------------------------------------------------
distributed.worker - INFO -         Registered to:    tcp://172.19.6.19:39227
distributed.worker - INFO - -------------------------------------------------
distributed.core - INFO - Starting established connection
distributed.worker - INFO - Stopping worker at tcp://172.19.6.19:37538
distributed.nanny - INFO - Worker closed
distributed.nanny - INFO - Closing Nanny at 'tcp://172.19.6.19:44324'
distributed.dask_worker - INFO - End worker
Manual setup
In this part, we show how to start manually the dask-scheduler and how to spawn the workers. Hereafter, workers will not be created as new jobs but new steps inside a main job. We advise to use this workflow to avoid filling the scheduler queue.
First, we create a new slurm launcher: cluster_steps_workers.sh
#!/bin/bash -l

#SBATCH -p batch
#SBATCH -J DASK_steps_workers
#SBATCH -N 2
#SBATCH -n 10
#SBATCH -c 1
#SBATCH -t 00:30:00

# Load the python version used to install Dask
module load lang/Python

# Make sure that you have an virtualenv dask_env installed
export DASK_VENV="$1"
shift
if [ ! -d "${DASK_VENV}" ] || [ ! -f "${DASK_VENV}/bin/activate" ]; then

        echo "Error with virtualenv" && exit 1

    fi

# Source the python env
source "${DASK_VENV}/bin/activate"

# Dask configuration to store the scheduler file
DASK_CONFIG="${HOME}/.dask"
DASK_JOB_CONFIG="${DASK_CONFIG}/job_${SLURM_JOB_ID}"
mkdir -p ${DASK_JOB_CONFIG}
export SCHEDULER_FILE="${DASK_JOB_CONFIG}/scheduler.json"


# Number of tasks - 1 controller task - 1 python task
export NB_WORKERS=$((${SLURM_NTASKS}-2))


LOG_DIR="$(pwd)/logs/job_${SLURM_JOBID}"
mkdir -p ${LOG_DIR}

# Start scheduler on this first task
srun -w $(hostname) --output=${LOG_DIR}/scheduler-%j-workers.out  --exclusive -N 1 -n 1 -c ${SLURM_CPUS_PER_TASK} \
     dask-scheduler  --scheduler-file "${SCHEDULER_FILE}"  --interface "ib0" &
sleep 10

#srun: runs ipengine on each other available core
srun --output=${LOG_DIR}/ipengine-%j-workers.out \
     --exclusive -n ${NB_WORKERS} -c ${SLURM_CPUS_PER_TASK} \
     --cpu-bind=cores dask-worker  \
     --label \
     --interface "ib0" \
     --scheduler-file "${SCHEDULER_FILE}"  &

sleep 25

srun --output=${LOG_DIR}/code-%j-execution.out  --exclusive -N 1 -n 1 -c ${SLURM_CPUS_PER_TASK} python -u $*
Remark The launcher below requests 10 tasks on 2 nodes with 1 cpu per task. This is NOT an efficient use of the hardware but only for educational purpose. Please always try to maximize nodes usage, i.e., 28 tasks max on iris, 128 max on aion or decrease and increase multithreading if possible. You may use --ntasks-per-nodesor --ntasks-per-socket for this purpose. Please also refer to the ULHPC documentation for more details.
To illustrate this manual setting, we are going now to scale XGBoost using Dask. XGBoost is an optimized gradient boosting library designed to be highly efficient, flexible and portable. Gradient boosted trees can be distributed by making Dask and XGBoost working together. XGBoost provides a powerful prediction framework, and it works well in practice. It wins Kaggle contests and is popular in industry because it has good performance and can be easily interpreted (i.e., it’s easy to find the important features from a XGBoost model).

|
|
Suppose we have access to Dask cluster with a set of workers. The first task is to install the xgboost library.
pip install xgboost
then create the following script cluster_steps_workers.py:
from dask.distributed import Client
# Library to generate plots
import matplotlib as mpl
# Define Agg as Backend for matplotlib when no X server is running
mpl.use('Agg')
import matplotlib.pyplot as plt
import dask
import xgboost as xgb
import dask.array as da
import json
import os

data=[]
# Using the distributed shared file system, we can access to the Dask cluster
# configuration.
# We read the scheduler address and port from the scheduler file
with open(os.environ["SCHEDULER_FILE"]) as f:
        data = json.load(f)
        scheduler_address=data['address']

# Connect to the the cluster
client = Client(scheduler_address)
client.wait_for_workers()

# X and y must be Dask dataframes or arrays
num_obs = 1e5
num_features = 20
X = da.random.random(size=(num_obs, num_features), chunks=(1000, num_features))
y = da.random.random(size=(num_obs, 1), chunks=(1000, 1))

# Training
dtrain = xgb.dask.DaskDMatrix(client, X, y)

output = xgb.dask.train(
    client,
    {"verbosity": 2, "tree_method": "hist", "objective": "reg:squarederror"},
    dtrain,
    num_boost_round=10,
    evals=[(dtrain, "train")],
)

booster = output['booster']  # booster is the trained model
history = output['history']  # A dictionary containing evaluation results

ax = xgb.plot_importance(booster, height=0.8, max_num_features=9)
ax.grid(False, axis="y")
ax.set_title('Estimated feature importance')
plt.savefig("importance.png")

# Stop Dask cluster
client.shutdown()
You can try the manual setup example using the following command: sbatch cluster_steps_workers.sh dask_env_${ULHPC_CLUSTER} cluster_steps_workers.py.
Remark on the worker Thread Pool
Each worker sends computations to a thread in a concurrent.futures.ThreadPoolExecutor for computation. These computations occur in the same process as the Worker communication server so that they can access and share data efficiently between each other. For the purposes of data locality all threads within a worker are considered the same worker.
If your computations are mostly numeric in nature (for example NumPy and Pandas computations) and release the GIL entirely then it is advisable to run dask-worker processes with many threads and one process. This reduces communication costs and generally simplifies deployment.
If your computations are mostly Python code and don’t release the GIL then it is advisable to run dask-worker processes with many processes and one thread per process:
$ dask-worker scheduler:8786 --nprocs 8 --nthreads 1
This will launch 8 worker processes each of which has its own ThreadPoolExecutor of size 1.
If your computations are external to Python and long-running and don’t release the GIL then beware that while the computation is running the worker process will not be able to communicate to other workers or to the scheduler. This situation should be avoided. If you don’t link in your own custom C/Fortran code then this topic probably doesn’t apply.
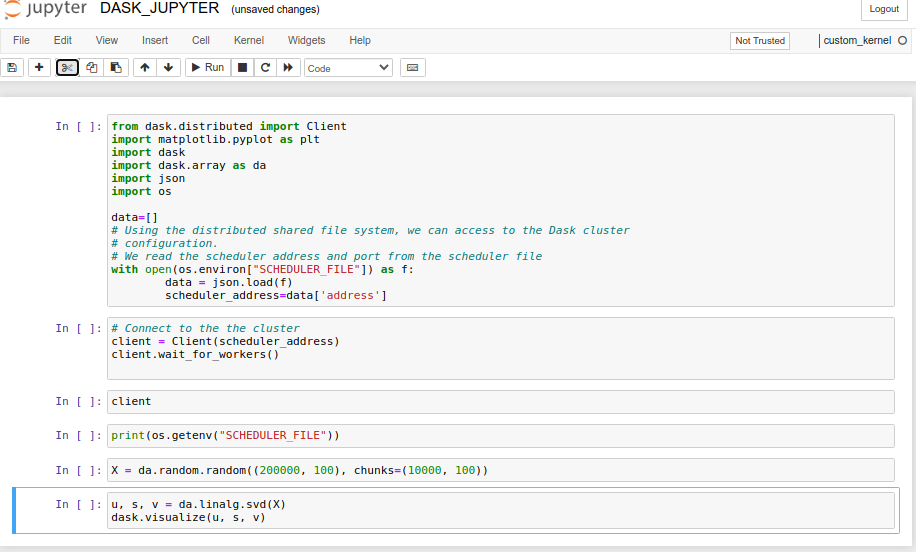
DASK + Jupyter
Dask can be used in combination with Jupyter to perform Parallel interactive computations. The dask_jupyter.sh launcher is an example how to start a Jupyter Notebook with Dask support. Here, we will only consider dask-worker processes ...
We start the notebook instance and the dask scheduler on the first node of the allocation and assign workers to remaining cores.
#!/bin/bash -l

#SBATCH -p batch
#SBATCH -J DASK_JUPYTER
#SBATCH -N 2
#SBATCH -n 10
#SBATCH -c 1
#SBATCH -t 00:30:00

# Load the python version used to install Dask
module load lang/Python

# Export Environment variables
# Set a environement which depends on which cluster you wish to start the notebook
export VENV="$HOME/.envs/jupyter_dask_${ULHPC_CLUSTER}"

# Replace default jupyter and environement variable by custom ones
# We add to the path the jobid for debugging purpose
export JUPYTER_CONFIG_DIR="$HOME/jupyter/$SLURM_JOBID/"
export JUPYTER_PATH="$VENV/share/jupyter":"$HOME/jupyter_sing/$SLURM_JOBID/jupyter_path"
export JUPYTER_DATA_DIR="$HOME/jupyter/$SLURM_JOBID/jupyter_data"
export JUPYTER_RUNTIME_DIR="$HOME/jupyter/$SLURM_JOBID/jupyter_runtime"

# We create the empty directory
mkdir -p $JUPYTER_CONFIG_DIR

# The Jupyter notebook will run on the first node of the slurm allocation (here only one anyway)
# We retrieve its address
export IP_ADDRESS=$(hostname -I | awk '{print $1}')

# Dask configuration to store the scheduler file
export DASK_CONFIG="${HOME}/.dask"
export DASK_JOB_CONFIG="${DASK_CONFIG}/job_${SLURM_JOB_ID}"
mkdir -p ${DASK_JOB_CONFIG}
export SCHEDULER_FILE="${DASK_JOB_CONFIG}/scheduler.json"


# Minimal virtualenv setup
# We create a minimal virtualenv with the necessary packages to start
if [ ! -d "$VENV" ];then
    echo "Building the virtual environment"
    # Create the virtualenv
    python3 -m venv $VENV
    # Load the virtualenv
    source "$VENV/bin/activate"
    # Upgrade pip
    python3 -m pip install pip --upgrade
    # Install minimum requirement
    python3 -m pip install dask[complete] matplotlib \
        dask-jobqueue \
        graphviz \
        xgboost \
        jupyter \
        jupyter-server-proxy

    # Setup ipykernel
    # "--sys-prefix" install ipykernel where python is installed
    # here next the python symlink inside the virtualenv
    python3 -m ipykernel install --sys-prefix --name custom_kernel --display-name custom_kernel
fi

export XDG_RUNTIME_DIR=""


# Source the python env
source "${VENV}/bin/activate"


#create a new ipython profile appended with the job id number
echo "On your laptop: ssh -p 8022 -NL 8889:${IP_ADDRESS}:8889 ${USER}@access-${ULHPC_CLUSTER}.uni.lu "

# Start jupyter on a single core
srun --exclusive -N 1 -n 1 -c 1 -w $(hostname) jupyter notebook --ip ${IP_ADDRESS} --no-browser --port 8889 &

sleep 5s

# No real need to use srun here ....
# We should only be careful to call the jupyter executable where the
# notebook instance has been started

srun --exclusive -N 1 -n 1 -c 1 -w $(hostname) jupyter notebook list
srun --exclusive -N 1 -n 1 -c 1 -w $(hostname) jupyter --paths
srun --exclusive -N 1 -n 1 -c 1 -w $(hostname) jupyter kernelspec list


# Start scheduler on this first task
srun -w $(hostname) --exclusive -N 1 -n 1 -c 1 \
     dask-scheduler  --scheduler-file "${SCHEDULER_FILE}"  --interface "ib0" &
sleep 10

# Number of tasks - 1 controller task - 1 jupyter task
export NB_WORKERS=$((${SLURM_NTASKS}-2))

#srun: runs ipengine on each other available core
srun  --exclusive -n ${NB_WORKERS} -c 1 \
     --cpu-bind=cores dask-worker  \
     --label \
     --interface "ib0" \
     --scheduler-file "${SCHEDULER_FILE}"  &

wait
You can start dask+jupyter by issuing the following command: sbatch dask_jupyter.sh. Using tail -F slurm-<idjob>.out, you can observe the different setups, i.e., notebook + dask cluster.
Once all setups have been performed, you should see a similar output than the one below:
In your laptop: ssh -p 8022 -NL 8889:172.17.6.155:8889 ekieffer@access-iris.uni.lu
[I 16:08:17.627 NotebookApp] Writing notebook server cookie secret to /home/users/ekieffer/jupyter/2540915/jupyter_runtime/notebook_cookie_secret
[I 16:08:18.485 NotebookApp] Serving notebooks from local directory: /mnt/irisgpfs/users/ekieffer/HPC_SCHOOL_2021/python/advanced/dask-ml/scripts
[I 16:08:18.485 NotebookApp] Jupyter Notebook 6.4.5 is running at:
[I 16:08:18.485 NotebookApp] http://172.17.6.155:8889/?token=a32b995ddd86e73eac5a4e9d20cbc9907ac52a5afb92c1d7
[I 16:08:18.485 NotebookApp]  or http://127.0.0.1:8889/?token=a32b995ddd86e73eac5a4e9d20cbc9907ac52a5afb92c1d7
[I 16:08:18.485 NotebookApp] Use Control-C to stop this server and shut down all kernels (twice to skip confirmation).
[C 16:08:18.490 NotebookApp]

    To access the notebook, open this file in a browser:
        file:///home/users/ekieffer/jupyter/2540915/jupyter_runtime/nbserver-117695-open.html
    Or copy and paste one of these URLs:
        http://172.17.6.155:8889/?token=a32b995ddd86e73eac5a4e9d20cbc9907ac52a5afb92c1d7
     or http://127.0.0.1:8889/?token=a32b995ddd86e73eac5a4e9d20cbc9907ac52a5afb92c1d7
Currently running servers:
http://172.17.6.155:8889/?token=a32b995ddd86e73eac5a4e9d20cbc9907ac52a5afb92c1d7 :: /mnt/irisgpfs/users/ekieffer/HPC_SCHOOL_2021/python/advanced/dask-ml/scripts
config:
    /home/users/ekieffer/jupyter/2540915/
    /home/users/ekieffer/.envs/jupyter_dask_iris/etc/jupyter
    /usr/local/etc/jupyter
    /etc/jupyter
data:
    /home/users/ekieffer/.envs/jupyter_dask_iris/share/jupyter
    /home/users/ekieffer/jupyter_sing/2540915/jupyter_path
    /home/users/ekieffer/jupyter/2540915/jupyter_data
    /home/users/ekieffer/.envs/jupyter_dask_iris/share/jupyter
    /usr/local/share/jupyter
    /usr/share/jupyter
runtime:
    /home/users/ekieffer/jupyter/2540915/jupyter_runtime
Available kernels:
  custom_kernel    /home/users/ekieffer/.envs/jupyter_dask_iris/share/jupyter/kernels/custom_kernel
  python3          /home/users/ekieffer/.envs/jupyter_dask_iris/share/jupyter/kernels/python3
distributed.scheduler - INFO - -----------------------------------------------
distributed.scheduler - INFO - -----------------------------------------------
distributed.scheduler - INFO - Clear task state
distributed.scheduler - INFO -   Scheduler at:   tcp://172.19.6.155:8786
distributed.scheduler - INFO -   dashboard at:         172.19.6.155:8787
distributed.nanny - INFO -         Start Nanny at: 'tcp://172.19.6.155:46160'
distributed.nanny - INFO -         Start Nanny at: 'tcp://172.19.6.155:33160'
distributed.nanny - INFO -         Start Nanny at: 'tcp://172.19.6.155:46866'
distributed.worker - INFO -       Start worker at:   tcp://172.19.6.155:37158
distributed.worker - INFO -       Start worker at:   tcp://172.19.6.155:41399
distributed.worker - INFO -          Listening to:   tcp://172.19.6.155:37158
distributed.worker - INFO -       Start worker at:   tcp://172.19.6.155:41713
distributed.worker - INFO -          dashboard at:         172.19.6.155:37929
distributed.worker - INFO -          Listening to:   tcp://172.19.6.155:41713
distributed.worker - INFO - Waiting to connect to:    tcp://172.19.6.155:8786
distributed.worker - INFO - -------------------------------------------------
distributed.worker - INFO -          dashboard at:         172.19.6.155:40746
distributed.worker - INFO -               Threads:                          1
distributed.worker - INFO - Waiting to connect to:    tcp://172.19.6.155:8786
Use the foolwing ssh command: ssh -p 8022 -NL 8889:${IP_ADDRESS}:8889 ${USER}@access-${ULHPC_CLUSTER}.uni.lu displayed in the output file to be able to access the notebook from your local machine.
In order to access the notebook for the first time, please click on the link containing the token (ex:http://127.0.0.1:8889/?token=<token_value>). This link has been generated in the output file.
You should have now access to the DASK_JUPYTER.ipynb notebook (see below).
References
- https://distributed.dask.org/en/latest/
- https://jobqueue.dask.org/en/latest/
- https://wiki.mpimet.mpg.de/doku.php?id=analysis:pot_pourri:sapphire:dask_parallel_postprocessing