![]()
![]()

![]()
![]()

UL HPC MPI Tutorial: Building and Runnning OSU Micro-Benchmarks
Copyright (c) 2013-2021 UL HPC Team <hpc-sysadmins@uni.lu>
The objective of this tutorial is to compile and run on of the OSU micro-benchmarks which permit to measure the performance of an MPI implementation. Kindly ensure your followed the "Scalable Science and Parallel computations with OpenMP/MPI" tutorial
The latest version of this tutorial is available on Github. Finally, advanced MPI users might be interested to take a look at the Intel Math Kernel Library Link Line Advisor.
Objectives
The OSU micro-benchmarks feature a series of MPI benchmarks that measure the performances of various MPI operations:
- Point-to-Point MPI Benchmarks: Latency, multi-threaded latency, multi-pair latency, multiple bandwidth / message rate test bandwidth, bidirectional bandwidth
- Collective MPI Benchmarks: Collective latency tests for various MPI collective operations such as MPI_Allgather, MPI_Alltoall, MPI_Allreduce, MPI_Barrier, MPI_Bcast, MPI_Gather, MPI_Reduce, MPI_Reduce_Scatter, MPI_Scatter and vector collectives.
- One-sided MPI Benchmarks: one-sided put latency (active/passive), one-sided put bandwidth (active/passive), one-sided put bidirectional bandwidth, one-sided get latency (active/passive), one-sided get bandwidth (active/passive), one-sided accumulate latency (active/passive), compare and swap latency (passive), and fetch and operate (passive) for MVAPICH2 (MPI-2 and MPI-3).
- Since the 4.3 version, the OSU micro-benchmarks also features OpenSHMEM benchmarks, a 1-sided communications library.
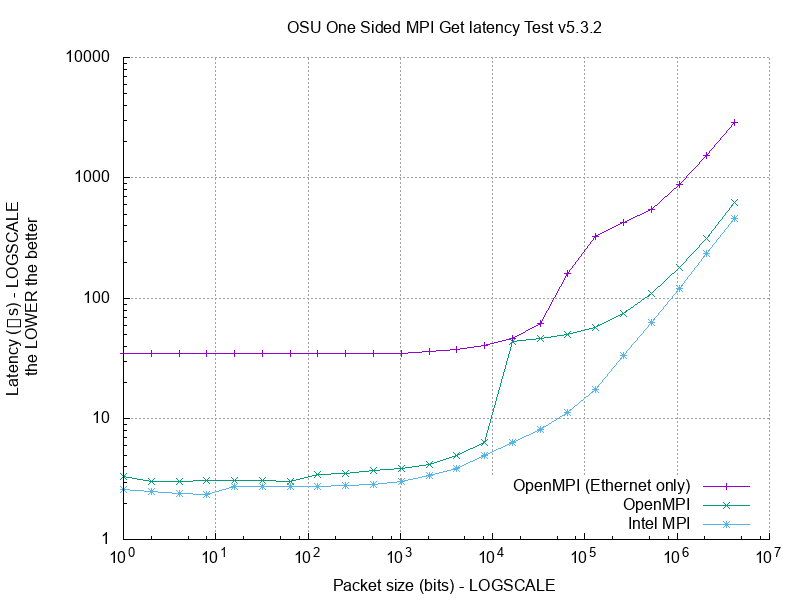
In this tutorial, we will build version 5.8 of the OSU micro-benchmarks (the latest at the time of writing), and focus on two of the available tests:
osu_get_latency- Latency Testosu_get_bw- Bandwidth Test
The latency tests are carried out in a ping-pong fashion. The sender sends a message with a certain data size to the receiver and waits for a reply from the receiver. The receiver receives the message from the sender and sends back a reply with the same data size. Many iterations of this ping-pong test are carried out and average one-way latency numbers are obtained. Blocking version of MPI functions (MPI_Send and MPI_Recv) are used in the tests.
The bandwidth tests were carried out by having the sender sending out a fixed number (equal to the window size) of back-to-back messages to the receiver and then waiting for a reply from the receiver. The receiver sends the reply only after receiving all these messages. This process is repeated for several iterations and the bandwidth is calculated based on the elapsed time (from the time sender sends the first message until the time it receives the reply back from the receiver) and the number of bytes sent by the sender. The objective of this bandwidth test is to determine the maximum sustained date rate that can be achieved at the network level. Thus, non-blocking version of MPI functions (MPI_Isend and MPI_Irecv) were used in the test.
The idea is to compare the different MPI implementations available on the UL HPC platform.:
For the sake of time and simplicity, we will focus on the first two suits. Eventually, the benchmarking campain will typically involves for each MPI suit two nodes
Pre-requisites
If not yet done, you'll need to pull the latest changes in your working copy of the ULHPC/tutorials you should have cloned in ~/git/github.com/ULHPC/tutorials (see "preliminaries" tutorial)
(access)$ cd ~/git/github.com/ULHPC/tutorials
(access)$ git pull
Now configure a dedicated directory ~/tutorials/OSU-MicroBenchmarks for this session
# return to your home
(access)$ mkdir -p ~/tutorials/OSU-MicroBenchmarks
(access)$ cd ~/tutorials/OSU-MicroBenchmarks
# create a symbolic link to the top reference material
(access)$ ln -s ~/git/github.com/ULHPC/tutorials/parallel/mpi/OSU_MicroBenchmarks ref.d  # Symlink to the reference tutorial
# create other convenient symlinks
(access)$ ln -s ref.d/Makefile .     # symlink to the root Makefile - DO NOT forget the trailing '.'
(access)$ ln -s ref.d/scripts  .     # symlinkls to launcher/build scripts - DO NOT forget the trailing '.'
Advanced users (eventually yet strongly recommended), create a Tmux session (see Tmux cheat sheet and tutorial) or GNU Screen session you can recover later. See also "Getting Started" tutorial .
Now you can reserve an interactive job on 2 nodes and 1 task per node (for 30 minutes)
(access)$> si -N 2 --ntasks-per-node=1 -t 0:30:00
$ echo $SLURM_NTASKS
Fetch and uncompress OSU Micro-benchmarks Sources
Fetch and uncompress the latest version of the OSU micro-benchmarks
$ cd ~/tutorials/OSU-MicroBenchmarks
$ mkdir src
$ cd src
# Download the latest version
$ export OSU_VERSION=5.8     # Just to abstract from the version to download
$ wget --no-check-certificate http://mvapich.cse.ohio-state.edu/download/mvapich/osu-micro-benchmarks-${OSU_VERSION}.tgz
$ tar xf osu-micro-benchmarks-${OSU_VERSION}.tar.gz
$ cd osu-micro-benchmarks-${OSU_VERSION}
- (only if you have trouble to fetch and uncompress):
make uncompress
Building the OSU Micro-benchmarks
We will build the OSU micro-benchmarks for each considered MPI suit, thus in a separate directory build.<suit> -- that's a good habit you're encouraged to follow (as with CMake based projects)
In all cases, you should now operate the compilation within an interactive job to be able to use the module command.
# If not yet done
(access)$> si -N 2 --ntasks-per-node=1
Compilation based on the Intel MPI suit
We are first going to use the Intel Cluster Toolkit Compiler Edition, which provides Intel C/C++ and Fortran compilers, Intel MPI. We will compile the OSU micro-benchmarks in a specific directory (that a good habbit)
$ cd ~/tutorials/OSU-MicroBenchmarks/
$ mkdir build.intel    # Prepare the specific building directory
$ cd  build.intel
$ echo $OSU_VERSION    # Check that the variable is defined and with teh appropriate value
# Load the appropriate module
$ module load toolchain/intel
# Configure the Intel MPI-based build for installation in the current directory
$ ../src/osu-micro-benchmarks-${OSU_VERSION}/configure CC=mpiicc CXX=mpiicpc CFLAGS=-I$(pwd)/../src/osu-micro-benchmarks-${OSU_VERSION}/util --prefix=$(pwd)
$ make && make install
Questions:
- Q1: Why did we request the use of the
--prefixat the configure step ? - Q2: Why did we enforce the environment variables
CCandCXX? - Q3: Why did we enforce the environment variables
CFLAGS?
If everything goes fine, you shall have the OSU micro-benchmarks installed in the directory libexec/osu-micro-benchmarks/mpi/.
- (only if you have trouble to compile):
./scripts/build.OSU intel
Once compiled, ensure you are able to run it:
$ cd libexec/osu-micro-benchmarks/mpi/one-sided/
$ srun -n $SLURM_NTASKS ./osu_get_latency
$ srun -n $SLURM_NTASKS ./osu_get_bw
Compilation based on the OpenMPI suit
Repeat the procedure for the OpenMPI suit:
$ cd ~/tutorials/OSU-MicroBenchmarks/
$ mkdir build.openmpi    # Prepare the specific building directory
$ cd  build.openmpi
$ echo $OSU_VERSION    # Check that the variable is defined and with teh appropriate value
# Clean the previously loaded module and load the appropriate OpenMPI one
$ module purge
$ module load mpi/OpenMPI
$ module list
# Configure the OpenMPI-based build for installation in the current directory
$> ../src/osu-micro-benchmarks-${OSU_VERSION}/configure CC=mpicc CFLAGS=-I$(pwd)/../src/osu-micro-benchmarks-${OSU_VERSION}/util --prefix=$(pwd)
$> make && make install
Questions:
- Q4: Why do we need to precise the
CCvariable at the configure step? -
Q5: How to get rid of
CFLAGSat the configure step ? -
(only if you have trouble to compile):
./scripts/build.OSU
Once compiled, ensure you are able to run it:
$ cd libexec/osu-micro-benchmarks/mpi/one-sided/
$ srun -n $SLURM_NTASKS ./osu_get_latency
$ srun -n $SLURM_NTASKS ./osu_get_bw
OSU Launcher script
We are now going to prepare launcher scripts to permit passive runs (typically in the {default | batch} queue).
We will place them in a separate directory (runs/) as it will host the outcomes of the executions on the UL HPC platform .
$ cd ~/tutorials/OSU-MicroBenchmarks/
$ mkdir runs    # Prepare the specific run directory
$ cd runs
$ cp ../ref.d/runs/launcher.OSU.sh .
You can test the script in an interactive job as follows:
# go into the runs directory
$ cd ~/tutorials/OSU-MicroBenchmarks/runs
$ si -N 2 --ntasks-per-node=1     # create an interactive job, 1 core on 2 nodes
$ ./launcher.OSU.sh -h
$ ./launcher.OSU.sh
$ ./launcher.OSU.sh intel
Exit your job and test it in batch mode:
$ cd ~/tutorials/OSU-MicroBenchmarks/runs
$ sbatch ./launcher.OSU.sh
$ sbatch ./launcher.OSU.sh intel
Now for Lazy / frustrated persons
You will find in the UL HPC tutorial
repository, under the parallel/mpi/OSU_MicroBenchmarks directory, a set of tools / script that
facilitate the running and analysis of this tutorial that you can use/adapt to
suit your needs. In particular,
- running
make fetchwill automatically download the archives for the OSU micro-benchmarks in thesrc/directory - The different launcher files in
runs/ - Some sample output data in
runs/data/ - run
make buildto build the different versions of the OSU Micro-benchmarks - run
make plotto invoke the Gnuplot scriptplots/benchmark_OSU.gnuplotand generate various plots from the sample runs.
You can find the obtained results (long time ago ;)) on the iris cluster: