![]()
![]()

![]()
![]()

Using and Building [custom] software with EasyBuild on the UL HPC platform
Copyright (c) 2014-2021 UL HPC Team hpc-sysadmins@uni.lu
Authors: Xavier Besseron, Maxime Schmitt, Sarah Peter, Sébastien Varrette and UL HPC Team hpc-team@uni.lu

The objective of this tutorial is to show how tools such as EasyBuild or stow can be used to ease, automate and script the build of software on the UL HPC platforms.
Indeed, as researchers involved in many cutting-edge and hot topics, you probably have access to many theoretical resources to understand the surrounding concepts. Yet it should normally give you a wish to test the corresponding software.
Traditionally, this part is rather time-consuming and frustrating, especially when the developers did not rely on a "regular" building framework such as CMake or the autotools (i.e. with build instructions as configure --prefix <path> && make && make install).
And when it comes to have a build adapted to an HPC system, you are somehow forced to make a custom build performed on the target machine to ensure you will get the best possible performances. EasyBuild is one approach to facilitate this step.
Moreover, later on, you probably want to recover a system configuration matching the detailed installation paths through a set of environmental variable (ex: JAVA_HOME, HADOOP_HOME etc.). At least you would like to see the traditional PATH, CPATH or LD_LIBRARY_PATH updated.
Question: What is the purpose of the above mentioned environmental variable?
For this second aspect, the solution came long time ago (in 1991) with the [Environment Modules](http://modules.sourceforge.net/ and LMod We will cover it in the first part of this tutorial, also to discover the ULHPC User Software set in place.
In a second part, installation using an old yet effective tool named GNU stow will be depicted.
Finally the last part will cover Easybuild usage on the ULHPC platform to build and complete the existing software environment.
Pre-requisites
Ensure you are able to connect to the UL HPC clusters.
In particular, recall that the module command is not available on the access frontends.
If you have never configured Tmux or GNU Screen before, and while not strictly mandatory, we advise you to rely on these tools -- see "HPC Management of Sequential and Embarrassingly Parallel Jobs" tutorial.
Now you'll need to pull the latest changes in your working copy of the ULHPC/tutorials you should have cloned in ~/git/github.com/ULHPC/tutorials (see "preliminaries" tutorial)
(access)$> cd ~/git/github.com/ULHPC/tutorials
(access)$> git pull
Now configure a dedicated directory ~/tutorials/easybuild for this session
# return to your home
(access)$> mkdir -p ~/tutorials/easybuild
(access)$> cd ~/tutorials/easybuild
# create a symbolic link to the reference material
(access)$> ln -s ~/git/github.com/ULHPC/tutorials/tools/easybuild ref.d
Advanced users (eventually yet strongly recommended), create a Tmux session (see Tmux cheat sheet and tutorial) or GNU Screen session you can recover later. See also "Getting Started" tutorial .
# /!\ Advanced (but recommended) best-practice:
#     Always work within a TMux or GNU Screen session named '<topic>' (Adapt accordingly)
(access-aion)$> tmux new -s HPC-school   # Tmux
(access-iris)$> screen -S HPC-school     # GNU Screen
#  TMux     | GNU Screen | Action
# ----------|------------|----------------------------------------------
#  CTRL+b c | CTRL+a c   | (create) creates a new Screen window. The default Screen number is zero.
#  CTRL+b n | CTRL+a n   | (next) switches to the next window.
#  CTRL+b p | CTRL+a p   | (prev) switches to the previous window.
#  CTRL+b , | CTRL+a A   | (title) rename the current window
#  CTRL+b d | CTRL+a d   | (detach) detaches from a Screen -
# Once detached:
#   tmux ls  | screen -ls : list available screen
#   tmux att | screen -x  : reattach to a past screen
For all tests and compilation with Easybuild, you MUST work on a computing node. Let's get one in interactive jobs:
### Access to ULHPC cluster (if not yet done)
(laptop)$> ssh aion-cluster
### Have an interactive job, request 4 cores/thread for 2 hours
# ... either directly
(access)$> si --ntasks-per-node 1 -c 4 -t 2:00:00
# ... or using the HPC School reservation 'hpcschool'if needed  - use 'sinfo -T' to check if active and its name
# (access)$> si --reservation=hpcschool --ntasks-per-node 1 -c 4 -t 2:00:00
(node)$>
Part 1: Environment modules and LMod
The ULHPC facility relied on the Environment Modules / LMod framework which provided the module utility on Compute nodes
to manage nearly all software.
There are two main advantages of the module approach:
- ULHPC can provide many different versions and/or installations of a single software package on a given machine, including a default version as well as several older and newer version.
- Users can easily switch to different versions or installations
without having to explicitly specify different paths. With modules,
the
PATHand related environment variables (LD_LIBRARY_PATH,MANPATH, etc.) are automatically managed.
Environment Modules in itself are a standard and well-established technology across HPC sites, to permit developing and using complex software and libraries build with dependencies, allowing multiple versions of software stacks and combinations thereof to co-exist.
It brings the module command which is used to manage environment variables such as PATH, LD_LIBRARY_PATH and MANPATH, enabling the easy loading and unloading of application/library profiles and their dependencies.
See https://hpc-docs.uni.lu/environment/modules/ for more details
| Command | Description |
|---|---|
module avail |
Lists all the modules which are available to be loaded |
module spider <pattern> |
Search for |
module load <mod1> [mod2...] |
Load a module |
module unload <module> |
Unload a module |
module list |
List loaded modules |
module purge |
Unload all modules (purge) |
module display <module> |
Display what a module does |
module use <path> |
Prepend the directory to the MODULEPATH environment variable |
module unuse <path> |
Remove the directory from the MODULEPATH environment variable |
At the heart of environment modules interaction resides the following components:
- the
MODULEPATHenvironment variable, which defines the list of searched directories for modulefiles modulefile
Take a look at the current values:
# Example on Aion
$ module -h
$ echo $MODULEPATH
/opt/apps/resif/aion/2020b/epyc/modules/all:/opt/apps/smc/modules
$ module show toolchain/foss
-----------------------------------------------------------------------------------------------------------------
   /opt/apps/resif/aion/2020b/epyc/modules/all/toolchain/foss/2020b.lua:
-----------------------------------------------------------------------------------------------------------------
help([[
Description
===========
GNU Compiler Collection (GCC) based compiler toolchain, including
 OpenMPI for MPI support, OpenBLAS (BLAS and LAPACK support), FFTW and ScaLAPACK.


More information
================
 - Homepage: https://easybuild.readthedocs.io/en/master/Common-toolchains.html#foss-toolchain
]])
whatis("Description: GNU Compiler Collection (GCC) based compiler toolchain, including
 OpenMPI for MPI support, OpenBLAS (BLAS and LAPACK support), FFTW and ScaLAPACK.")
whatis("Homepage: https://easybuild.readthedocs.io/en/master/Common-toolchains.html#foss-toolchain")
whatis("URL: https://easybuild.readthedocs.io/en/master/Common-toolchains.html#foss-toolchain")
conflict("toolchain/foss")
load("compiler/GCC/10.2.0")
load("mpi/OpenMPI/4.0.5-GCC-10.2.0")
load("numlib/OpenBLAS/0.3.12-GCC-10.2.0")
load("numlib/FFTW/3.3.8-gompi-2020b")
load("numlib/ScaLAPACK/2.1.0-gompi-2020b")
setenv("EBROOTFOSS","/opt/apps/resif/aion/2020b/epyc/software/foss/2020b")
setenv("EBVERSIONFOSS","2020b")
setenv("EBDEVELFOSS","/opt/apps/resif/aion/2020b/epyc/software/foss/2020b/easybuild/toolchain-foss-2020b-easybuild-de
vel")
You have already access to a huge list of software:
$ module avail # OR 'module av'
Now you can search for a given software using module spider <pattern>:
$  module spider lang/Python
---------------------------------------------------------------------------------------------------------
  lang/Python:
---------------------------------------------------------------------------------------------------------
    Description:
      Python is a programming language that lets you work more quickly and integrate your systems more
      effectively.

     Versions:
        lang/Python/2.7.18-GCCcore-10.2.0
        lang/Python/3.8.6-GCCcore-10.2.0
Let's see the effect of loading/unloading a module
$> module list
No modules loaded
$> which python
/usr/bin/python
$> python --version       # System level python
Python 2.7.8

$> module load lang/Python    # use TAB to auto-complete
$> which python
/opt/apps/resif/aion/2020b/epyc/software/Python/3.8.6-GCCcore-10.2.0/bin/python
$> python --version
Python Python 3.8.6
$> module purge
ULHPC $MODULEPATH
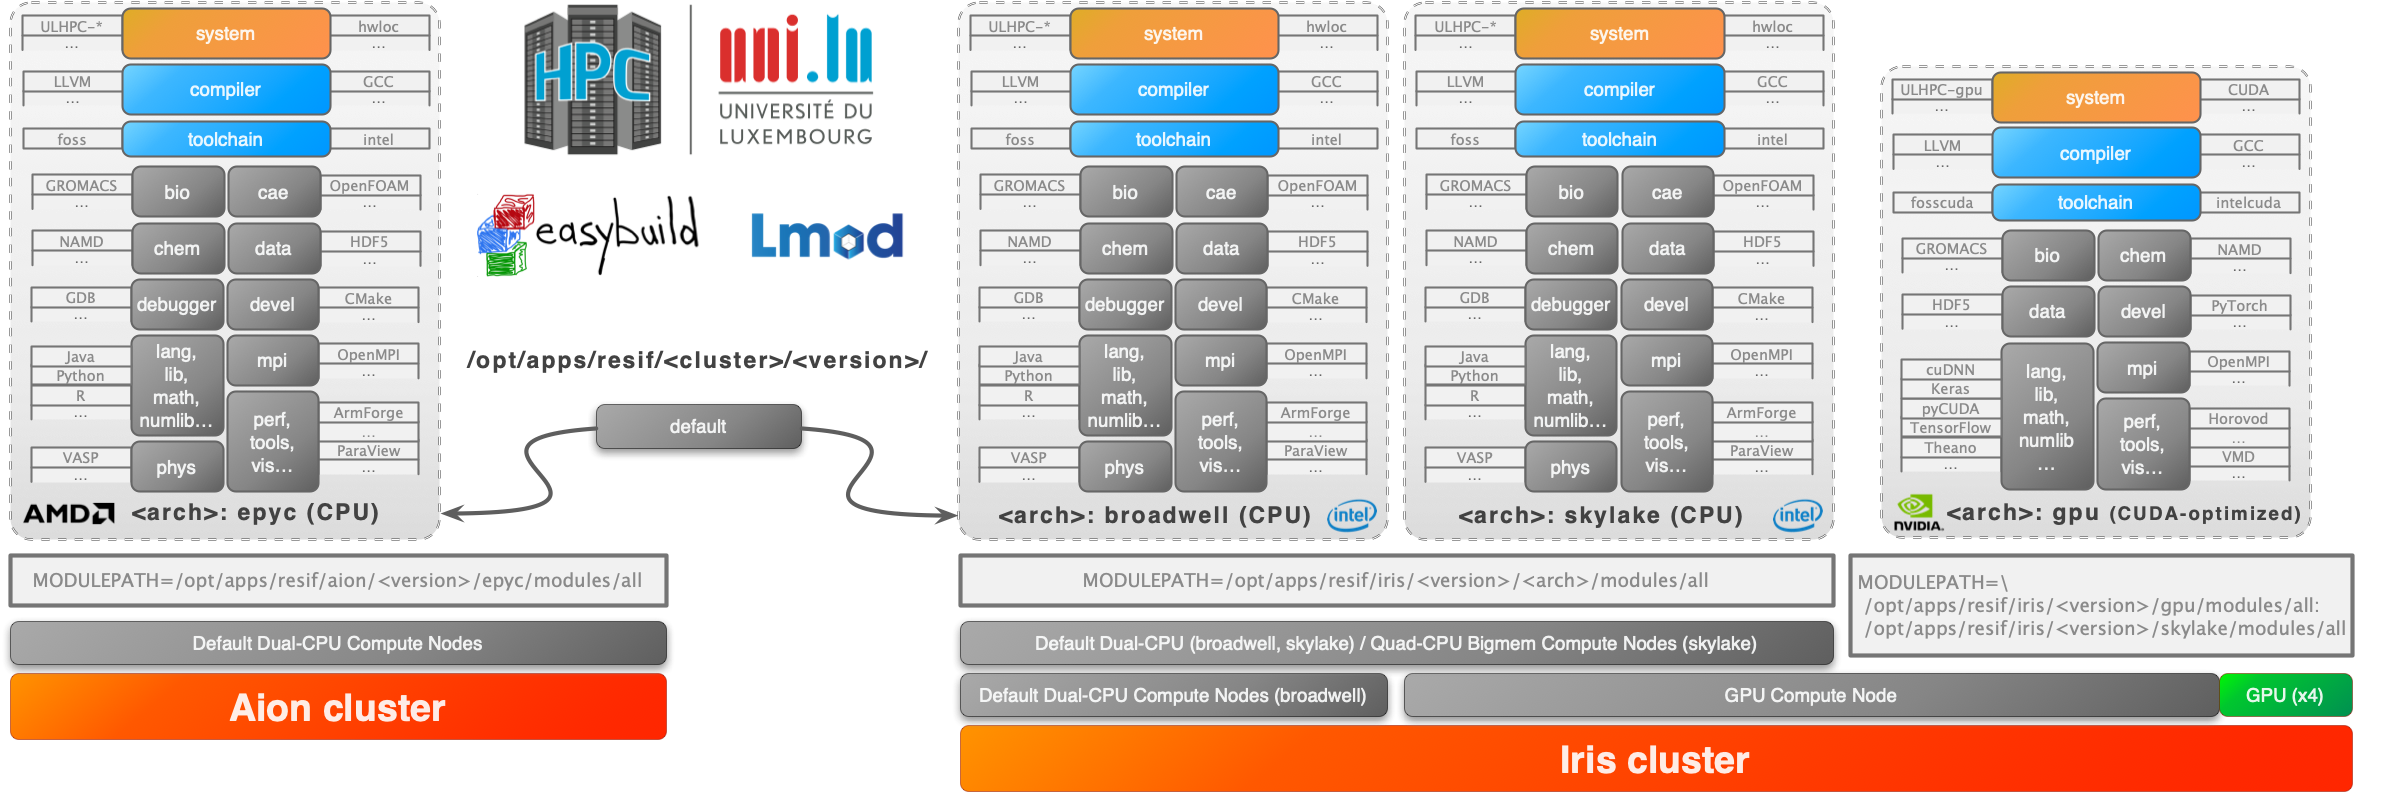
By default, the MODULEPATH environment variable holds a single searched directory holding the optimized builds prepared for you by the ULHPC Team.
The general format of this directory is as follows:
/opt/apps/resif/<cluster>/<version>/<arch>/modules/all
where:
<cluster>depicts the name of the cluster (irisoraion). Stored as$ULHPC_CLUSTER.<version>corresponds to the ULHPC Software set release (aligned with Easybuid toolchains release), i.e.2019b,2020aetc. It is stored as$RESIF_VERSION_{PROD,DEVEL,LEGACY}.<arch>is a lower-case strings that categorize the CPU architecture of the build host, and permits to easyli identify optimized target architecture. It is stored as$RESIF_ARCH- On Intel nodes:
broadwell(default),skylake - On AMD nodes:
epyc - On GPU nodes:
gpu
- On Intel nodes:
| Cluster | Arch. | $MODULEPATH Environment variable |
|---|---|---|
| Iris | broadwell (default) |
/opt/apps/resif/iris/<version>/broadwell/modules/all |
| Iris | skylake |
/opt/apps/resif/iris/<version>/skylake/modules/all |
| Iris | gpu |
/opt/apps/resif/iris/<version>/gpu/modules/all |
| Aion | epyc (default) |
/opt/apps/resif/aion/<version>/{epyc}/modules/all |
Now let's assume that a given software you're looking at is not available, or not in the version you want. Before we continue, there are a set of local environmental variables defined on the ULHPC facility that you will be interested to use in the sequel.
| Environment Variable | Description | Example |
|---|---|---|
$ULHPC_CLUSTER |
Current ULHPC supercomputer you're connected to | aion |
$RESIF_VERSION_{PROD,DEVEL,LEGACY} |
Production / development / legacy ULHPC software set version | 2020b |
$RESIF_ARCH |
RESIF Architecture | epyc |
$MODULEPATH_{PROD,DEVEL,LEGACY} |
Production / development / legacy MODULEPATH | /opt/apps/resif/aion/2021b/{epyc}/modules/all |
Part 2: GNU Stow (Autotools software)
That's somehow the OLD way yet still very effective way of managing locally built software.
It was used to quickly build the latest version of the parallel command in the "GNU Parallel" Tutorial.
It assumes to understand the following concepts:
- stow directory (
~/stow): root directory which contains all the stow packages, each with their own private subtree.- each subdirectory represents a stow package (
<name>-<version>-<cluster>typically)
- each subdirectory represents a stow package (
- stow package: nothing more than a list of files and directories related to a specific software, managed as an entity.
- stow target directory: the directory in which the package files must appear to be installed.
- By default the stow target directory is considered to be the one above the directory in which stow is invoked from. This behaviour can be easily changed by using the
-toption (short for--target), which allows us to specify an alternative directory.
- By default the stow target directory is considered to be the one above the directory in which stow is invoked from. This behaviour can be easily changed by using the
Stow permits to quickly install / uninstall a stow package as follows:
cd ~/stow
stow <name>-<version>-<cluster>  # install / enable <name> package
# [...]
stow -D <name>-<version>-<cluster>  # uninstall / disable <name> package
You first need to setup your homedir to host stow packages:
$ cd      # go to your HOME
$ mkdir -p bin include lib share/{doc,man} src
# create stowdir
$ mkdir stow
We are going to build and install 2 concurrent versions of a given software available on the ULHPC yet on an old version: GNU parallel.
- build the lastest (up-to-date) version as in the "GNU Parallel" Tutorial.
- build the version 20201222 version
Now that there are 2 clusters available for production, you are advised to rename stow packages to reflect the cluster on which it was built:
### Ex: building GNU parallel
# check default (system) verison
$ which parallel
/usr/bin/parallel
$ parallel --version
GNU parallel 20190922

# build latest version under ~/src/parallel/[...]
$ mkdir -p ~/src/parallel
$ cd ~/src/parallel
# download latest version
$ wget https://ftpmirror.gnu.org/parallel/parallel-latest.tar.bz2     # 20211022
$ wget  https://ftpmirror.gnu.org/parallel/parallel-20201222.tar.bz2  # 20201222
# uncompress
$ tar xf parallel-latest.tar.bz2
$ tar xf parallel-20201222.tar.bz2
### Build into a stow package those name reflect the building cluster and/or arch
#  Build latest version...
$ cd parallel-20211022
# abstracted/geeky form to make the prefix directory align to current top directory
#                 if in doubt, use --prefix ~/stow/<name>-<version>-${ULHPC_CLUSTER}
$ ./configure --prefix ~/stow/$(basename $(pwd))-${ULHPC_CLUSTER}
$ make && make install
# ... and intermediate one
$ cd ../parallel-20201222
$ ./configure --prefix ~/stow/$(basename $(pwd))-${ULHPC_CLUSTER}
$ make && make install
Now you have 3 versions co-existing:
- the system version
/usr/bin/parallel(enabled) - the latest built one as a stow package
~/stow/parallel-20211222-${ULHPC_CLUSTER}/bin/parallel - the intermediate built as a stow package
~/stow/parallel-20201222-${ULHPC_CLUSTER}/bin/parallel
You can quickly enable the latest version with stow:
$ cd ~/stow
$ stow parallel-20211222-${ULHPC_CLUSTER}
# check effect
$ ll ~/bin/parallel
lrwxrwxrwx 1 svarrette clusterusers 43 Nov 16 00:43 /home/users/svarrette/bin/parallel -> ../stow/parallel-20211022-aion/bin/parallel
$ which parallel
~/bin/parallel
$ parallel --version
GNU parallel 20211022
Imagine that you want to quickly check the intermediate version, with stow it's straightforward:
$ cd ~/stow
# uninstall/disable stow package -- ignore the 'BUG in find_stowed_path?' message due to https://github.com/aspiers/stow/issues/65
$ stow -D parallel-20211222-${ULHPC_CLUSTER}
$ ll ~/bin/parallel
ls: cannot access /home/users/svarrette/bin/parallel: No such file or directory
$ which parallel
/usr/bin/parallel
$  parallel --version
bash: /home/users/svarrette/bin/parallel: No such file or directory
# occasional error -- refresh your path profile
$ source ~/.profile
$ parallel --version
GNU parallel 20190922
$ Enable intermediate version
$ stow parallel-20201222-aion
$ parallel --version
GNU parallel 20201222
GNU stow is very useful for software relying on Autotools (./configure [...]; make && make install).
Yet nowadays most software builds are way more complex and rely more and more on over building tools (cmake, ninja, internal scripts etc.).
You would need a consistent workflow to build the software.
That's where EasyBuild comes into play.
Part 3: Easybuild
![]()
EasyBuild is a tool that allows to perform automated and reproducible compilation and installation of software. A large number of scientific software are supported (2506 supported software packages in the last release 4.5.0) -- see also What is EasyBuild?
All builds and installations are performed at user level, so you don't need the admin (i.e. root) rights.
The software are installed in your home directory under $EASYBUILD_PREFIX -- see https://hpc-docs.uni.lu/environment/easybuild/
| Default setting (local) | Recommended setting | |
|---|---|---|
$EASYBUILD_PREFIX |
$HOME/.local/easybuild |
$HOME/.local/easybuild/${ULHPC_CLUSTER}/${RESIF_VERSION_PROD}/${RESIF_ARCH} |
- built software are placed under
${EASYBUILD_PREFIX}/software/ - modules install path
${EASYBUILD_PREFIX}/modules/all
Local Easybuild configuration
Follow the instructions from the ULHPC technical documentation to adapt you custom build to cluster, the toolchain version and the architecture as done in RESIF3 by editing with your favorite editor (nano, vim etc. your ~/.bashrc
# EASYBUILD_PREFIX: [basedir]/<cluster>/<environment>/<arch>
# Ex: Default EASYBUILD_PREFIX in your home - Adapt to project directory if needed
_EB_PREFIX=$HOME/.local/easybuild
# ... eventually complemented with cluster
[ -n "${ULHPC_CLUSTER}" ] && _EB_PREFIX="${_EB_PREFIX}/${ULHPC_CLUSTER}"
# ... eventually complemented with software set version
_EB_PREFIX="${_EB_PREFIX}/${RESIF_VERSION_PROD}"
# ... eventually complemented with arch
[ -n "${RESIF_ARCH}" ] && _EB_PREFIX="${_EB_PREFIX}/${RESIF_ARCH}"
export EASYBUILD_PREFIX="${_EB_PREFIX}"
export LOCAL_MODULES=${EASYBUILD_PREFIX}/modules/all
Save the changed, Source the configuration and check that you now have the expected value for EASYBUILD_PREFIX:
$ echo $EASYBUILD_PREFIX
/home/users/svarrette/.local/easybuild     # Default value
$ source ~/.bashrc
$ echo $EASYBUILD_PREFIX
/home/users/svarrette/.local/easybuild/aion/2020b/epyc
Easybuild main concepts
See also the official Easybuild Tutorial: "Maintaining a Modern Scientific Software Stack Made Easy with EasyBuild"
EasyBuild relies on two main concepts: Toolchains and EasyConfig files.
A toolchain corresponds to a compiler and a set of libraries which are commonly used to build a software.
The two main toolchains frequently used on the UL HPC platform are the foss ("Free and Open Source Software") and the intel one.
fossis based on the GCC compiler and on open-source libraries (OpenMPI, OpenBLAS, etc.).intelis based on the Intel compiler and on Intel libraries (Intel MPI, Intel Math Kernel Library, etc.).
An EasyConfig file is a simple text file that describes the build process of a software. For most software that uses standard procedures (like configure, make and make install), this file is very simple.
Many EasyConfig files are already provided with EasyBuild.
By default, EasyConfig files and generated modules are named using the following convention:
<Software-Name>-<Software-Version>-<Toolchain-Name>-<Toolchain-Version>.
However, we use a hierarchical approach where the software are classified under a category (or class) -- see the CategorizedModuleNamingScheme option for the EASYBUILD_MODULE_NAMING_SCHEME environmental variable), meaning that the layout will respect the following hierarchy:
<Software-Class>/<Software-Name>/<Software-Version>-<Toolchain-Name>-<Toolchain-Version>
Additional details are available on EasyBuild website:
- EasyBuild homepage
- EasyBuild documentation
- What is EasyBuild?
- Toolchains
- EasyConfig files
- List of supported software packages
Easybuild is provided to you as a software module.
module load tools/EasyBuild
In case you cant to install the latest version yourself, follow the * the official instructions.
What is important for the installation of Easybuild are the following variables:
EASYBUILD_PREFIX: where to install local modules and software, i.e.$HOME/.local/easybuildEASYBUILD_MODULES_TOOL: the type of modules tool you are using, i.e.LModin this caseEASYBUILD_MODULE_NAMING_SCHEME: the way the software and modules should be organized (flat view or hierarchical) -- we're advising onCategorizedModuleNamingScheme
/!\ IMPORTANT: Recall that you should be on a compute node to install [Easybuild]((http://easybuild.readthedocs.io) (otherwise the checks of the module command availability will fail.)
Install a missing software
Let's try to install the missing software
(node)$ module spider BCFtools   # Complementaty tool to SAMTools
Lmod has detected the following error:  Unable to find: "BCFtools".

# Load Easybuild
(node)$ module load tools/EasyBuild
# Search for recipes for the missing software
(node)$ eb -S BCFtools
CFGS1=/opt/apps/resif/aion/2020b/epyc/software/EasyBuild/4.4.1/easybuild/easyconfigs
 * $CFGS1/b/BCFtools/BCFtools-1.2_extHTSlib_Makefile.patch
 * $CFGS1/b/BCFtools/BCFtools-1.3-foss-2016a.eb
 * $CFGS1/b/BCFtools/BCFtools-1.3-intel-2016a.eb
 * $CFGS1/b/BCFtools/BCFtools-1.3.1-foss-2016b.eb
 * $CFGS1/b/BCFtools/BCFtools-1.3_extHTSlib_Makefile.patch
 * $CFGS1/b/BCFtools/BCFtools-1.6-foss-2016b.eb
 * $CFGS1/b/BCFtools/BCFtools-1.6-foss-2017b.eb
 * $CFGS1/b/BCFtools/BCFtools-1.6-intel-2017b.eb
 * $CFGS1/b/BCFtools/BCFtools-1.8-GCC-6.4.0-2.28.eb
 * $CFGS1/b/BCFtools/BCFtools-1.9-foss-2018a.eb
 * $CFGS1/b/BCFtools/BCFtools-1.9-foss-2018b.eb
 * $CFGS1/b/BCFtools/BCFtools-1.9-iccifort-2019.1.144-GCC-8.2.0-2.31.1.eb
 * $CFGS1/b/BCFtools/BCFtools-1.9-intel-2018b.eb
 * $CFGS1/b/BCFtools/BCFtools-1.10.2-GCC-8.3.0.eb
 * $CFGS1/b/BCFtools/BCFtools-1.10.2-GCC-9.3.0.eb
 * $CFGS1/b/BCFtools/BCFtools-1.10.2-iccifort-2019.5.281.eb
 * $CFGS1/b/BCFtools/BCFtools-1.11-GCC-10.2.0.eb
 * $CFGS1/b/BCFtools/BCFtools-1.12-GCC-9.3.0.eb
 * $CFGS1/b/BCFtools/BCFtools-1.12-GCC-10.2.0.eb
From this list, you should select the version matching the target toolchain version -- see ULHPC Toolchains and Software Set Versioning documentation
In particular, for 2020b version, the GCC[core] is set to 10.2.0 so BCFtools-1.12-GCC-10.2.0.eb seems like a promising candidate .
Once you pick a given recipy (for instance BCFtools-1.12-GCC-10.2.0.eb), install it with
eb <name>.eb [-D] -r
-Denables the dry-run mode to check what's going to be install -- ALWAYS try it first-renables the robot mode to automatically install all dependencies while searching for easyconfigs in a set of pre-defined directories -- you can also prepend new directories to search for eb files (like the current directory$PWD) using the option and syntax--robot-paths=$PWD:(do not forget the ':'). See Controlling the robot search path documentation- The
$CFGS<n>/prefix should be dropped unless you know what you're doing (and thus have previously defined the variable -- see the first output of theeb -S [...]command).
Let's try to review the missing dependencies from a dry-run :
# Select the one matching the target software set version
(node)$ eb BCFtools-1.12-GCC-10.2.0.eb -Dr   # Dry-run
== Temporary log file in case of crash /tmp/eb-73oGNP/easybuild-seaUIw.log
Dry run: printing build status of easyconfigs and dependencies
CFGS=/opt/apps/resif/aion/2020b/epyc/software/EasyBuild/4.4.1/easybuild/easyconfigs
 * [x] $CFGS/m/M4/M4-1.4.18.eb (module: devel/M4/1.4.18)
 * [x] $CFGS/b/Bison/Bison-3.5.3.eb (module: lang/Bison/3.5.3)
 * [x] $CFGS/b/Bison/Bison-3.7.1.eb (module: lang/Bison/3.7.1)
 * [x] $CFGS/z/zlib/zlib-1.2.11.eb (module: lib/zlib/1.2.11)
 * [x] $CFGS/h/help2man/help2man-1.47.4.eb (module: tools/help2man/1.47.4)
 * [x] $CFGS/f/flex/flex-2.6.4.eb (module: lang/flex/2.6.4)
 * [x] $CFGS/b/binutils/binutils-2.35.eb (module: tools/binutils/2.35)
 * [x] $CFGS/g/GCCcore/GCCcore-10.2.0.eb (module: compiler/GCCcore/10.2.0)
 * [x] $CFGS/z/zlib/zlib-1.2.11-GCCcore-10.2.0.eb (module: lib/zlib/1.2.11-GCCcore-10.2.0)
 * [x] $CFGS/n/ncurses/ncurses-6.2.eb (module: devel/ncurses/6.2)
 * [x] $CFGS/g/gettext/gettext-0.21.eb (module: tools/gettext/0.21)
 * [x] $CFGS/h/help2man/help2man-1.47.16-GCCcore-10.2.0.eb (module: tools/help2man/1.47.16-GCCcore-10.2.0)
 * [x] $CFGS/m/M4/M4-1.4.18-GCCcore-10.2.0.eb (module: devel/M4/1.4.18-GCCcore-10.2.0)
 * [x] $CFGS/b/Bison/Bison-3.7.1-GCCcore-10.2.0.eb (module: lang/Bison/3.7.1-GCCcore-10.2.0)
 * [x] $CFGS/f/flex/flex-2.6.4-GCCcore-10.2.0.eb (module: lang/flex/2.6.4-GCCcore-10.2.0)
 * [x] $CFGS/b/binutils/binutils-2.35-GCCcore-10.2.0.eb (module: tools/binutils/2.35-GCCcore-10.2.0)
 * [x] $CFGS/c/cURL/cURL-7.72.0-GCCcore-10.2.0.eb (module: tools/cURL/7.72.0-GCCcore-10.2.0)
 * [x] $CFGS/g/GCC/GCC-10.2.0.eb (module: compiler/GCC/10.2.0)
 * [x] $CFGS/b/bzip2/bzip2-1.0.8-GCCcore-10.2.0.eb (module: tools/bzip2/1.0.8-GCCcore-10.2.0)
 * [x] $CFGS/x/XZ/XZ-5.2.5-GCCcore-10.2.0.eb (module: tools/XZ/5.2.5-GCCcore-10.2.0)
 * [x] $CFGS/g/GSL/GSL-2.6-GCC-10.2.0.eb (module: numlib/GSL/2.6-GCC-10.2.0)
 * [x] $CFGS/h/HTSlib/HTSlib-1.12-GCC-10.2.0.eb (module: bio/HTSlib/1.12-GCC-10.2.0)
 * [ ] $CFGS/b/BCFtools/BCFtools-1.12-GCC-10.2.0.eb (module: bio/BCFtools/1.12-GCC-10.2.0)
Let's try to install it (remove the -D):
# Select the one matching the target software set version
(node)$ eb BCFtools-1.12-GCC-10.2.0.eb -r
Since you are going to use quite often the above command to use locally built modules and load easybuild, an alias mu is provided and can be used from now on. Use it now.
(node)$> mu
(node)$> module avail     # OR 'ma'
Now you should be able to check the installed software:
(node)$  module spider BCF

-----------------------------------------------------------------------------------------------------
  bio/BCFtools: bio/BCFtools/1.12-GCC-10.2.0
-----------------------------------------------------------------------------------------------------
    Description:
      Samtools is a suite of programs for interacting with high-throughput sequencing data. BCFtools -
      Reading/writing BCF2/VCF/gVCF files and calling/filtering/summarising SNP and short indel sequence
      variants
   This module can be loaded directly: module load bio/BCFtools/1.12-GCC-10.2.0

    Help:

      Description
      ===========
      Samtools is a suite of programs for interacting with high-throughput sequencing data.
       BCFtools - Reading/writing BCF2/VCF/gVCF files and calling/filtering/summarising SNP and short indel sequence
       variants


      More information
      ================
       - Homepage: https://www.htslib.org/
Tips: When you load a module <NAME> generated by Easybuild, it is installed within the directory reported by the $EBROOT<NAME> variable.
In the above case, you will find the generated binary in ${EBROOTBCFTOOLS}/.
Build software using a customized EasyConfig file
There are multiple ways to amend an EasyConfig file. Check the --try-* option flags for all the possibilities.
Generally you want to do that when the up-to-date version of the software you want is not available as a recipy within Easybuild. For instance, a very popular building environment CMake has recently released a new version (3.19.1), which you want to give a try.
It is not available as module, so let's build it.
First let's check for available easyconfigs recipy if one exist for the expected version:
(node)$> eb -S Cmake-3
[...]
 * $CFGS2/c/CMake/CMake-3.12.1.eb
 * $CFGS2/c/CMake/CMake-3.15.3-GCCcore-8.3.0.eb
 * $CFGS2/c/CMake/CMake-3.15.3-fix-toc-flag.patch
 * $CFGS2/c/CMake/CMake-3.16.4-GCCcore-9.3.0.eb
 * $CFGS2/c/CMake/CMake-3.18.4-GCCcore-10.2.0.eb
[...]
You may want to reuse the helper script ./scripts/suggest-easyconfigs to find the versions available (and detect the dependencies version to be place in the custom Easyconfig).
We are going to reuse one of the latest EasyConfig available, for instance lets copy $CFGS2/c/CMake/CMake-3.18.4-GCCcore-10.2.0.eb as it was the most recent.
We'll have to make it match the toolchain/compiler available by default in 2019b i.e. GCCcore-8.3.0.
# Work in a dedicated directory
(node)$> mkdir -p ~/software/CMake
(node)$> cd ~/software/CMake

(node)$> eb -S Cmake-3|less   # collect the definition of the CFGS2 variable
(node)$> CFGS2=/Users/svarrette/git/github.com/ULHPC/easybuild-easyconfigs/easybuild/easyconfigs
(node)$> cp $CFGS2/c/CMake/CMake-3.18.4-GCCcore-10.2.0.eb .
# Adapt the filename with the target version and your default building environement - here 2019b software set
(node)$> mv CMake-3.18.4-GCCcore-8.3.0.eb        # Adapt version suffix to the lastest realse
You need to perform the following changes (here: version upgrade, adapted checksum) To find the appropriate version for the dependencies, use:
# Summarize matchin versions for list of dependencies
./scripts/suggest-easyconfigs -s ncurses zlib bzip2 cURL libarchive
           ncurses: ncurses-6.1-GCCcore-8.3.0.eb
              zlib: zlib-1.2.11-GCCcore-8.3.0.eb
             bzip2: bzip2-1.0.8-GCCcore-8.3.0.eb
              cURL: cURL-7.66.0-GCCcore-8.3.0.eb
        libarchive: libarchive-3.4.3-GCCcore-10.2.0.eb
--- CMake-3.18.4-GCCcore-10.2.0.eb  2020-12-09 22:33:12.375199000 +0100
+++ CMake-3.19.1-GCCcore-8.3.0.eb   2020-12-09 22:42:40.238721000 +0100
@@ -1,5 +1,5 @@
 name = 'CMake'
-version = '3.18.4'
+version = '3.19.1'

 homepage = 'https://www.cmake.org'

@@ -8,22 +8,22 @@
  tools designed to build, test and package software.
 """

-toolchain = {'name': 'GCCcore', 'version': '10.2.0'}
+toolchain = {'name': 'GCCcore', 'version': '8.3.0'}

 source_urls = ['https://www.cmake.org/files/v%(version_major_minor)s']
 sources = [SOURCELOWER_TAR_GZ]
-checksums = ['597c61358e6a92ecbfad42a9b5321ddd801fc7e7eca08441307c9138382d4f77']
+checksums = ['1d266ea3a76ef650cdcf16c782a317cb4a7aa461617ee941e389cb48738a3aba']

 builddependencies = [
-    ('binutils', '2.35'),
+    ('binutils', '2.32'),
 ]

 dependencies = [
-    ('ncurses', '6.2'),
+    ('ncurses', '6.1'),
     ('zlib', '1.2.11'),
     ('bzip2', '1.0.8'),
-    ('cURL', '7.72.0'),
-    ('libarchive', '3.4.3'),
+    ('cURL', '7.66.0'),
+    ('libarchive', '3.4.0'),
     # OS dependency should be preferred if the os version is more recent then this version,
     # it's nice to have an up to date openssl for security reasons
     # ('OpenSSL', '1.1.1h'),
libarchive will have also to be adapted.
If the checksum is not provided on the official software page, you will need to compute it yourself by downloading the sources and collect the checksum:
(laptop)$> sha256sum ~/Downloads/cmake-3.19.1.tar.gz
1d266ea3a76ef650cdcf16c782a317cb4a7aa461617ee941e389cb48738a3aba  /Users/svarrette/Downloads/cmake-3.19.1.tar.gz
You can now build it
(node)$> eb ./CMake-3.19.1-GCCcore-8.3.0.eb -Dr
(node)$> eb ./CMake-3.19.1-GCCcore-8.3.0.eb -r
Note you can follow the progress of the installation in a separate shell on the node:
- (eventually) connect to the allocated node (using
sshoroarsub -C <jobid>depending on the cluster) - run
htop- press 'u' to filter by process owner, select your login
- press 'F5' to enable the tree view
Check the result:
(node)$> module av CMake
That's all ;-)
Final remaks
This workflow (copying an existing recipy, adapting the filename, the version and the source checksum) covers most of the test cases. Yet sometimes you need to work on a more complex dependency check, in which case you'll need to adapt many eb files. In this case, for each build, you need to instruct Easybuild to search for easyconfigs also in the current directory, in which case you will use:
$> eb <filename>.eb --robot=$PWD:$EASYBUILD_ROBOT -D
$> eb <filename>.eb --robot=$PWD:$EASYBUILD_ROBOT
Submitting working Easyconfigs to easybuilders
- Follow the Official documentations: