![]()
![]()

![]()
![]()

An introduction to Conda and environment management
Copyright (c) 2023 UL HPC Team hpc-sysadmins@uni.lu
Author: Georgios Kafanas
The objective of this tutorial is to cover the basics of package management with Conda. Conda environments can simultaneously install dependencies from multiple software distributions, such as Python and R. Package management systems native to distributions of Python, R, and Julia will also be covered to demonstrate how Conda can interface with such systems.
In this tutorial the users will learn to:
- use Conda environments to manage the software and package dependencies of projects,
- document and exchange Conda environment setups for reproducibility,
- determine which is the best environment management tool given the requirements of a project, and
- instal packages using the facilities available in R, Python, and Julia when these packages are not available in Conda.
Pre-requisites
This tutorial focuses on generic aspects of package management. It is assumed that you have some basic knowledge of how to use packages in R or Python. The main package management framework used is Conda, although there will be mentions to tools native to R, Python, and Julia. You can use the techniques covered here both in your personal machine and on the UL HPC clusters. If you would like to setup environments in the UL HPC clusters, please ensure that you are able to connect first.
A brief introduction to Conda
You must be familiar with a few concepts to start working with Conda. In brief, these concepts are package managers which are the programs used to create and manage environments, channels which are the repositories that contain the packages from which environments are composed, and distributions which are systems for shipping package managers.
Package managers
Package managers are the programs that install and manage the Conda environments. There are multiple package managers, such as conda, mamba, and micromamba.
The UL HPC centre supports the use of micromamba for the creation and management of personal Conda environments.
Channels
Conda channels are the locations where packages are stored. There are also multiple channels, with some important channels being:
defaults, the default channel,anaconda, a mirror of the default channel,bioconda, a distribution of bioinformatics software, andconda-forge, a community-led collection of recipes, build infrastructure, and distributions for the conda package manager.
The most useful channel that comes pre-installed in all distributions, is Conda-Forge. Channels are usually hosted in the official Anaconda page, but in some rare occasions custom channels may be used. For instance the default channel is hosted independently from the official Anaconda page. Many channels also maintain web pages with documentation both for their usage and for packages they distribute:
Distributions
Quite often, the package manager is not distributed on its own, but with a set of packages that are required for the package manager to work, or even with some additional packages that required for most applications. For instance, the conda package manager is distributed with the Miniconda and Anaconda distributions. Miniconda contains the bare minimum packages for the conda package manager to work, and Anaconda contains multiple commonly used packages and a graphical user interface. The relation between these distributions and the package manager is depicted in the following diagram.

The situation is similar for Mamba distributions. Mamba distributions are supported by Conda-Forge, and their default installation options set-up conda-forge as the default and only channel during installation. The defaults or its mirror anaconda must be explicitly added if required. The distribution using the Mamba package manager was originally distributed as Mambaforge and was recently renamed to Miniforge. Miniforge comes with a minimal set of python packages required by the Mamba package manager. The distribution using the Micromamba package manager ships no accompanying packages, as Micromamba is a standalone executable with no dependencies. Micromamba is using libmamba, a C++ library implementing the Conda API.
The Micromamba package manager
![]()
The Micromaba package manager is a minimal yet fairly complete implementation of the Conda interface in C++, which is shipped as a standalone executable. The package manager operates strictly on the user-space and thus it requires no special permissions to install packages. It maintains all its files in a couple of places, so uninstalling the package manager itself is also easy. Finally, the package manager is also lightweight and fast.
UL HPC provides support only for the Micromamba package manager.
Installation
A complete guide regarding Micromamba installation can be found in the official documentation. To install micromamaba in the HPC clusters, log in to Aion or Iris. Working on a login node, run the installation script,
"${SHELL}" <(curl -L micro.mamba.pm/install.sh)
which will install the executable and setup the environment. There are 4 options to select during the installation of Micromamba:
- The directory for the installation of the binary file:
Micromamba binary folder? [~/.local/bin]Leave empty and press enter to select the default displayed within brackets. Your.bashrcscript should include~/.local/binin the$PATHby default. - The option to add to the environment autocomplete options for
micromamba:Init shell (bash)? [Y/n]Press enter to select the default optionY. This will append a clearly marked section in the.bashrcshell. Do not forget to remove this section when uninstalling Micromamba. - The option to configure the channels by adding conda-forge:
Configure conda-forge? [Y/n]Press enter to select the default optionY. This will setup the~/.condarcfile withconda-forgeas the default channel. Note that Mamba and Micromamba will not use thedefaultschannel if it is not present in~/.condarclikeconda. - The option to select the directory where environment information and packages will be stored:
Prefix location? [~/micromamba]Press enter to select the default option displayed within brackets.
To activate the new environment log-out and log-in again. You now can use micromamba in the login and compute nodes, including the auto-completion feature.
Managing environments
As an example we consider the creation and use of an environment for R jobs. The command,
$ micromamba create --name R-project
creates an environment named R-project. The environment is activated with the command
$ micromamba activate R-project
anywhere in the file system.
Next, install the base R environment package that contains the R program, and any R packages required by the project. To install packages, first ensure that the R-project environment is active, and then install any package with the command
$ micromamba install <package_name>
all the required packages. Quite often, the channel where Conda should first look for the package must also be specified. Using the syntax
$ micromamba install --chanell <chanell_1> --channels <chanell_2> <package_name>
channels are listed in a series of --channel <channel_name> entries and the channels are searched in the order they appear. Using the syntax
$ micromamba install <chanell>::<package_name>
packages are searched in the specified channel only. Available packages can be found by searching the conda-forge channel.
For instance, the basic functionality of the R software environment is contained in the r-base package. Calling
micromamba install --channel conda-forge r-base
or
micromamba install conda-forge::r-base
will install all the components required to run standalone R scripts. More involved scripts use functionality defined in various packages. The R packages are prepended with a prefix 'r-'. Thus, plm becomes r-plm and so on. After all the required packages have been installed, the environment is ready for use.
Packages in the conda-forge channel come with instructions for their installation. Quite often the channel is specified in the installation instructions, conda-forge::<package name> or even -c conda-forge or --channel conda-forge. While the Micromamba installer sets-up conda-forge as the default channel, latter modification in ~/.condarc may change the channel priority. Thus it is a good practice to explicitly specify the source channel when installing a package.
After work in an environment is complete, deactivate the environment,
$ micromamba deactivate
to ensure that it does not interfere with any other operations. In contrast to modules, Conda is designed to operate with a single environment active at a time. Create one environment for each project, and Conda will ensure that any package that is shared between multiple environments is installed once.
Micromamba supports almost all the subcommands of Conda. For more details see the official documentation.
Using environments in submission scripts
Since all computationally heavy operations must be performed in compute nodes, Conda environments are also used in jobs submitted to the queuing system. You can activate and deactivate environment in various sections of your script.
Returning to the R example, a submission script running a single core R job can use the R-project_name environment as follows:
#SBATCH --job-name R-test-job
#SBATCH --nodes 1
#SBATCH --ntasks-per-node 1
#SBATCH --cpus-per-task 1
#SBATCH --time=0-02:00:00
#SBATCH --partition batch
#SBATCH --qos normal

micromamba activate R-project

echo "Launched at $(date)"
echo "Job ID: ${SLURM_JOBID}"
echo "Node list: ${SLURM_NODELIST}"
echo "Submit dir.: ${SLURM_SUBMIT_DIR}"
echo "Numb. of cores: ${SLURM_CPUS_PER_TASK}"

export SRUN_CPUS_PER_TASK="${SLURM_CPUS_PER_TASK}"
export OMP_NUM_THREADS=1
srun Rscript --no-save --no-restore script.R

micromamba deactivate
Environment activations in Conda are stacked, and unlike modules, only one environment is active at a time with the rest being pushed down the stack. Consider the following script excerpt.
# Initialization code

micromabma activate python-project

# Code to run a simulation and generate output with Python

micromabma activate R-project

# Code to perform statistical analysis and ploting with R

micromamba deactivate

# Code to save data with Python
These script creates the following environment stack.
(base)
|
| # No software is available here
|
+-(python-project) # micromabma activate python-project
| |
| | # Only Python is available here
| |
| +-(R-project) # micromabma activate R-project
| | |
| | | # Only R is available here
| | |
| +-+ # micromamba deactivate
| |
| | # Only Python is available here
| |
We can see that the Python environment (python-project) remains in the stack while the R environment (R-project) is active, and will be broght forth as soon as the R environment is deactivated.
Useful scripting resources
Exporting and importing environment specifications
An important feature of Conda is that it allows you to export and version control you environment specifications, and recreate the environment on demand.
- A description of the software installed in the Conda environment can be exported on demand to a text file.
- In turn, a specification file can be used to populate a new environment, in effect recreating the environment.
The environment reproducibility is particularly important when you want to have reproducible results, like for instance in a scientific simulation. You can setup and test your application in your local machine, save the environment, and later load the environment in an HPC system, and be sure that the application will behave identically. Conda in the background will ensure that identical packages will be installed.
In Micromaba, you can export the specifications of an environment using the command:
$ micromaba env export --name <environment name>
By default the command prints to the standard output, but you can redirect the output to a file:
$ micromaba env export --name <environment name> > <environment name>.yaml
To recreate an environment from a specification file, pass the file as argument to the create command with the --file flag:
$ micromamba env create --name <environment name> --file <environment name>.yaml
This workflow demonstrates the use of simple text files to store specifications, but Micormamba supports various specification file types. All specification files are text files and can be version controlled with a tool such as Git.
Sources
Example: Installing Jupyter and managing the dependencies of a notebook with Micromamba
In this example we will create an environment, install Jupyter, and install all the dependencies for our notebooks with Micromamba. Start by creating an environment:
micromamba env create --name jupyter
Next, install Jupyter in the environment. Have a look at the page for jupyterlab in the conda-forge channel. To install it in your environment call:
micromamba install --name jupyter conda-forge::jupyterlab
Now activate the environment, create a working directory for your notebooks, and launch Jypyter:
micromamba activate jupyter
mkdir ~/Documents/notebooks && cd ~/Documents/notebooks
jupyter lab
If a webpage appears with the Jupyter lab, the installation worked succeeded!
You may need some Python package in your Jupyter notebook. You can make packages available in your notebook by installing the appropriate package in the Conda environment. For instance, assume that you need pandas and numpy. Searching the conda-forge channel, we can find the package name and installation instruction. With the jupyter environment active, run the command:
micromamba install conda-forge::numpy conda-forge::pandas
You should now be able to import numpy and pandas in your notebook!
After completing your work, close down the notebook with the command C-c, and deactivate the jupyter Conda environment:
micromamba deactive
You should now be in your normal operating system environment.
Self management of work environments in UL HPC with Conda
Conda is one of the systems for providing software in UL HPC systems, along with modules and containers. When starting a new project it is important to select the appropriate system.
Before installing any software yourself in user space you should contact the ULHPC High Level Support Team in the service portal [Home > Research > HPC > Software environment > Request expertise] to check if we can install the software in our system. A system wide installation will not consume any of your storage quota, and it will be configured and tested to provide optimal efficiency.
When a Conda environment is useful
There are three aspects of environment management that you should consider when selecting the method with which you will manage your software.
-
Ease of use: Many software systems whose performance is not critical and are used by relatively few users are not provided though the standard distribution channels of modules or containers. In such cases the easiest installation option is a user side installation with Conda or some similar package management system.
-
Reproducibility: Conda and containers can both create reproducible environments, with descriptions of the environment exported and version controlled in text files. However, containers require significant amount of manual configuration to create a reproducible environment and to perform well in a wide range of systems. If your aim is an easily reproducible environment Conda is the superior choice.
-
Performance: Conda provides precompiled executables. Even thought multiple configurations are supported, you will not always find an executable tailored to your target system. Modules and containers provided by UL UPC are optimized to ensure performance and stability in our systems, so prefer them.
Storage limitations in UL HPC
Regardless of installation method, when you install software in user space you are using up your storage quota. Conda environment managers download and store a sizable amount of data to provided packages to the various environments. Even though the package data are shared between the various environments, they still consume space in your or your project's account. There are limits in the storage space and number of files that are available to projects and users in the cluster. Since Conda packages are self managed, you need to clean unused data yourself.
Cleaning up package data
There are two main sources of unused data, compressed archives of packages that Conda stores in its cache when downloading a new package, and data of packages no longer used in any environment. All unused data in Micromoamba can be removed with the command
micromamba clean --all --yes
where the flag --yes suppresses an interactive dialogue with details about the operations performed. In general you can use the default options with --yes, unless you have manually edited any files in you package data directory (default location ~/micromamba) and you would like to preserve your changes.
Updating environments to remove old package versions
As we create new environments, we often install the latest version of each package. However, if the environments are not updated regularly, we may end up with different versions of the same package across multiple environments. If we have the same version of a package installed in all environments, we can save space by removing unused older versions.
To update a package across all environments, use the command
for e in $(micromamba env list | awk 'FNR>2 {print $1}'); do micromamba update --yes --name $e <package name>; done
and to update all packages across all environments
for e in $(micromamba env list | awk 'FNR>2 {print $1}'); do micromamba update --yes --name $e --all; done
where FNR>2 removes the headers in the output of micromamba env list, and is thus sensitive to changes in the user interface of Micromamba.
After updating packages, the clean command can be called to removed the data of unused older package versions.
Sources
A note about internal workings of Conda
In general, Conda packages are stored in a central directory, and hard links are created in the library directories of any environment that requires the package. Since hard links do not consume space and inodes, Conda is very efficient in its usage of storage space.
Consider for instance the MPFR package used in some environment gaussian_regression. Looking into the Conda installation managed by Micromamba, these are the installed library files:
gkaf@ulhpc-laptop:~/micromamba$ ls -lahFi pkgs/mpfr-4.2.1-h9458935_0/lib/
total 1.3M
5286432 drwxr-xr-x 1 gkaf gkaf   94 Oct 25 13:59 ./
5286426 drwxr-xr-x 1 gkaf gkaf   38 Oct 25 13:59 ../
5286436 lrwxrwxrwx 1 gkaf gkaf   16 Oct 22 21:47 libmpfr.so -> libmpfr.so.6.2.1*
5286441 lrwxrwxrwx 1 gkaf gkaf   16 Oct 22 21:47 libmpfr.so.6 -> libmpfr.so.6.2.1*
5286433 -rwxrwxr-x 7 gkaf gkaf 1.3M Oct 22 21:47 libmpfr.so.6.2.1*
5286442 drwxr-xr-x 1 gkaf gkaf   14 Oct 25 13:59 pkgconfig/
Looking into the libraries of the gaussian_regression environment, there is a hard link to the MPFR library:
gkaf@ulhpc-laptop:~/micromamba$ ls -lahFi envs/gaussian_regression/lib/libmpfr.so.6.2.1
5286433 -rwxrwxr-x 7 gkaf gkaf 1.3M Oct 22 21:47 envs/gaussian_regression/lib/libmpfr.so.6.2.1*
You can use the -i flag in ls to print the inode number of a file. Hard links have the same inode number, meaning that they are essentially the same file.
Conda will not automatically check if the files in the pkgs directories must be removed. For instance, when you uninstall a package from an environment, when you delete an environment, or when a package is updated in an environment, only the hard link in the environment directory will change. The files in pkgs will remain even if they are no longer used in any environment. The relevant clean routines check which packages are actually used and remove the unused files.
Environment management best practices
Environment management systems are diverse but support a simple common set of features, which are:
- the ability to create and reproduce software environments,
- isolation between environments and between each environment and the system, and
- easy access to multiple sources of software packages.
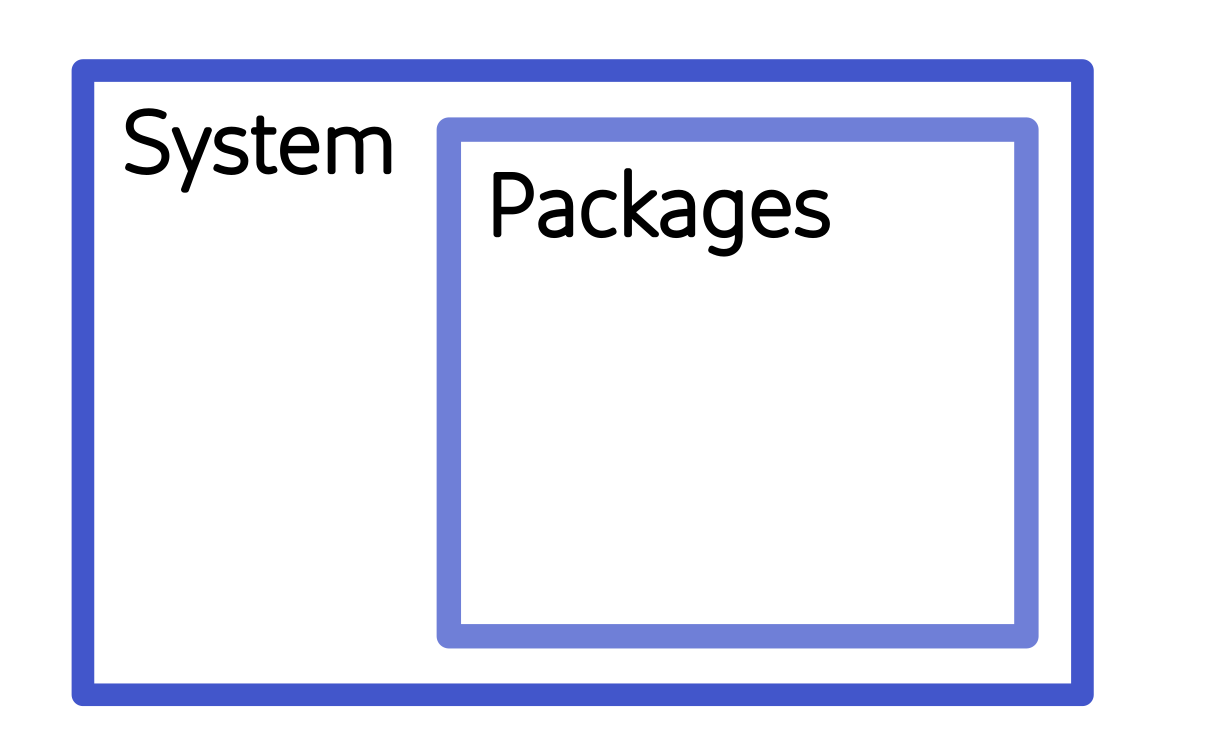
The environment of a software system can be categorized in 2 components,
- the system comprising of installed software components and environment settings, and
- the packages added to various software components of the environment.
The system is a superset of the packages in the environment, however, it makes sense to consider them separately as many software distributions provide native managers for the packages they ship.
Environment management systems usually focus on the management of the system, installing software, setting environment variables and so on. Package management systems on the other hand usually focus on managing the packages installed for some specific software component. The distinction albeit useful is not always clear, and usually environment managers that can also manage the packages of some software systems.
Furthermore, both environment and package management systems can be further subdivided according to the extend of the target environment. The management systems can target
- the whole system (system environment management tools), or
- the environment within a single project directory (project environment management tools).
All project environment management tools and most system environment management tools provide methods to
- store the environment setup in a text file that can be version controlled, and
- to recreate the environment from the description in the text file.
The project environment management tools in particular often automate the function of updating the text file describing the environment in order to automatically initialize the environment when initializing a new instance of the project. Thus project environments are very useful in storing a distributing research projects, since they automate the reproducibility of the project setup.
The overarching theory for environment management tools such as Conda is simple. However, there are implementation details which affect how environment management tools are used. In the following section we present some case studies about practical issues you may encounter with few environment management tools.
Using pip for Python package management
The official package installer for Python is pip. You can use pip to install packages from the Python Package Index (PyPI) and other indexes. With pip you can install packages in 3 modes,
- system-wide installation, where a package is available to all users,
- user-wide installation, where a package are installed in a special directory in the user home directory and are available to the user only, and
- environment installation where a package is only available inside the environment where it was installed.
Python is now part of many Linux distributions, such as Debian. This means now that users cannot (or should not) install packages system-wide using pip. User-wide and venv environment installations are still possible though.
To install a package user-wide use the command:
$ pip install --user <package_name>
User-wide installations install packages in a directory located at the home directory of the user. Python searches for packages in the user installation path first. This packages are meant to be installed with the system Python and run without root privileges. Thus user-wide installation is appropriate for packages that extend the system functionality for a single user.
User-wide installation is not recommended for all but the system Python environment. User-wide installations rely on system packages, so if you install any package using a Conda environment the package will depend on the Conda environment. Thus, packages installed user-wide with a Conda environment will may be incompatible with the system environment or with any other Conda environment.
Python venv virtual environments
For most applications, functionality should be installed in a virtual environment. To use a venv environment, first initialize the environment in some directory. The official distribution of Python comes packaged with the venv module that can create a virtual environment with the command:
$ python -m venv <path_to_directory>
You activate the environment with
$ source <path_to_directory>/bin/activate
and deactivate with:
$ deactivate
When the environment is active, you can install packages with the command:
$ pip install <package_name>
This is the same command installing packages system-wide, but because the environment is active the package is installed in the environment directory.
The pip package manager also provides the functionality required to export environment setups in text files and recreate environments from a text file description of the environment setup. To export the environment, activate the environment and use the freeze command:
$ source <path_to_directory>/bin/activate
(<environment name>) $ pip freeze > <environment name>.yml
To recreate the environment, create an empty environment,
python -m venv ~/environments/<environment name>
activate the environment,
source ~/environments/<environment name>/bin/activate
and install all the required packages from the requirement file:
(<environment name>) $ pip install --requirement /path/to/<environment name>.yml
When managing an environment, it is often required to upgrade a package to access new functionality or fix a bug. To upgrade a package with pip, simply install/reinstall the package with the --upgrade flag:
(<environment name>) $ pip install --upgrade <package name>
Note that in Python environments managed with pip, you have to update each package individually. Package management can thus be quote laborious, but there are some methods to speed up the process.
Finally, to delete a virtual environment installation simply deactivate the environment and remove its directory. Thus, assuming that an environment was installed in ~/environments/<environment name>, remove it with:
$ rm -r ~/environments/<environment name>
With all the features that pip provides, it is a very attractive method for creating and managing environments. However, is often necessary even when you are managing your environments with pip!
Creating a venv environment with Python installed in a Conda environment
In most distributions venv comes packages together with python, however, in some distributions venv is provided as an independent package. In Debian for instance, the system Python package, python3, does not contain the venv module. The module is distributed through the python3-venv package. You may want to avoid using the system package for a variety of reasons:
- The PyPI package you want to install may require a version of Python that is not provided by your system.
- You may be in a constrained system where installing a package such as
python3-venvis not possible, either because you don't have the rights, or because you are working with some high performance computer where installing a package required installing the package in hundreds of machines. - You may not want to pollute your system installation. In accordance to the UNIX philosophy use the system ensures that your machine operates correctly, and use the Conda to run the latest application!
The trick is to install a version of Python in a Conda environment, and use the Python installed in the Conda environment to create venv environments. Start by creating a python environment with the required version for python. For instance:
$ micromamba env create --name <environment name>-python
$ micromamba install --name <environment name>-python conda-forge::python
The Python distribution from conda-forge comes with venv installed. Use venv to create your virtual environment:
$ micromamba run --name <environment name>-python python -m venv ~/environments/<environment name>
It is a good idea to use some standard location to install global environments; a good choice is some directory in your home directory such as:
~/environments
Now an environment has been installed with the required version of python.
Any other tool requires the activation of the Conda environment before you are able to activate an environment created by an internal tool, such as venv. In fact, you can activate your venv as follows:
$ micromaba activate <environment name>-python
(<environment name>-python) $ source ~/environments/<environment name>/bin/activate
(<environment name>) (<environment name>-python) $
However, activating the Conda environment is redundant with a venv environment. Yow you can activate the environment simply with:
source ~/environments/<environment name>/bin/active
(<environment name>) $
After creating a venv environment you no longer need to interact with the Conda environment, <environment name>-python, except for updating Python itself. This is because pip environments are completely isolated from the system, except for the Python executable. If you browse the environment definition file,
$ cat ~/environments/<environment name>/pyvenv.cfg
home = /home/gkaf/micromamba/envs/<environment name>-python/bin
include-system-site-packages = false
version = 3.8.18
you can see that system package usage is disabled by default, with the option include-system-site-packages = false. Also, note that the binary directory of the Conda environment that provides the Python executable is noted in the home entry. This is important, as the only package that pip cannot install is python itself. The python executable is selected the environment is created with the command:
$ python -m venv ~/environments/<environment name>
In fact, listing the contents of ~/environments/<environment name>/bin, there are the symbolic links
python -> /home/gkaf/micromamba/envs/<environmen name>-python/bin/python
python3 -> python
that point to the Python installed in our Conda environment. Every other executable and library package installed in our environment, is installed locally, and as the options include-system-site-packages = false suggests, it will shadow any other package in the Conda environment.
Example: Installing Jupyter and managing the dependencies of a notebook with pip
In this example we create an environment, install Jupyter, and install all the dependencies for our notebooks with pip. Start by creating a Conda environment for the Python used in the venv environment:
micromamba env create --name jupyter-python
Next, install Python in the environment. Have a look at the page for Python in the conda-forge channel. To install it in your environment call:
micromamba install --name jupyter-python conda-forge::python
Now use the python of the jupyter-python environment to create your venv environment. We use the run command of Conda to execute a single shot command:
micromamba run --name jupyter-python python -m venv ~/environments/jupyter
We are now ready to activate our venv environment and install our main dependencies:
$ source ~/environments/jupyter/bin/activate
(jupyter) $ pip install jupyterlab
Now create a working directory for your notebooks, and launch Jupyter:
(jupyter) $ mkdir ~/Documents/notebooks && cd ~/Documents/notebooks
(jupyter) $ jupyter lab
If a webpage appears with the Jupyter lab, the installation worked succeeded!
You may need some Python package in your Jupyter notebook. You can install new packages at your venv environment. For instance, assume that you need pandas and numpy. Activate the environment, and install the dependencies with the command:
(jupyter) $ pip install numpy pandas
You should now be able to import numpy and pandas in your notebook!
After completing your work, close down the notebook with the command C-c, and deactivate the jupyter environment:
(jupyter) $ deactivate
You should now be in your normal operating system environment.
Combining Conda with other package management tools
In some cases Conda is used to manage the environment and other tools are used to install pacakges. There are a few reasons why you may want to manage packages with different tools.
-
You may want to use a project environment management tool. For instance, you may install Python with Conda and use project environments managed with Virtualenv, Pipenv and Poetry. In the case of R you may install R with Conda and manage project environments with Packrat.
-
In some cases packages are not available through Conda, but they may be available through other source code or binary distributions. A typical example is Julia where packages are only available trough the Pkg package manager. Similarly, many less popular packages are available through PyPI and can be installed with
pip, but they are not available through a Conda channel.
A list of case studies follows. In these case studies you can find how Conda and other package managers can be combined to install software.
Installing packages with pip in a Conda environment
In this example Conda and pip are used to create an environment for working with with MkDocs. We assume that we want to work with a custom python distribution installed in a Conda environment and we want to install 2 packages,
mkdocs, andmkdocs-minify-plugin.
While mkdocs is available though the conda-forge Conda channel, at the time of witting mkdocs-minify-plugin is only available through PyPI. At this point we have 3 options,
- install
mkdocsandmkdocs-minify-pluginin avenvenvironment, - install
mkdocsandmkdocs-minify-pluginin the Conda environment from PyPI withpip, or - install
mkdocsin a Conda andmkdocs-minify-pluginwithpip, by installingmkdocs-minify-plugineither- directly in the Conda environment, or
- in a
venvenvironment end enablingvenvto include system packages to accessmkdocs.
To begin with, create the base Conda environment which will provide the Python executable and related tools such as pip and venv.
micromamba env create --name mkdocs-python
Exporting the environment,
$ micromamba env export --name mkdocs-python
name: mkdocs-python
channels:
dependencies:
we can see that the environment is empty. Start by installing Python:
micromamba install --name mkdocs-python conda-forge::python
Exporting the environment specifications,
$ micromamba env export --name mkdocs-python
name: mkdocs-python
channels:
- conda-forge
dependencies:
- _libgcc_mutex=0.1=conda_forge
- _openmp_mutex=4.5=2_gnu
- bzip2=1.0.8=hd590300_5
- ca-certificates=2024.2.2=hbcca054_0
- ld_impl_linux-64=2.40=h41732ed_0
- libexpat=2.6.2=h59595ed_0
- libffi=3.4.2=h7f98852_5
- libgcc-ng=13.2.0=h807b86a_5
- libgomp=13.2.0=h807b86a_5
- libnsl=2.0.1=hd590300_0
- libsqlite=3.45.2=h2797004_0
- libuuid=2.38.1=h0b41bf4_0
- libxcrypt=4.4.36=hd590300_1
- libzlib=1.2.13=hd590300_5
- ncurses=6.4.20240210=h59595ed_0
- openssl=3.2.1=hd590300_1
- pip=24.0=pyhd8ed1ab_0
- python=3.12.2=hab00c5b_0_cpython
- readline=8.2=h8228510_1
- setuptools=69.2.0=pyhd8ed1ab_0
- tk=8.6.13=noxft_h4845f30_101
- tzdata=2024a=h0c530f3_0
- wheel=0.43.0=pyhd8ed1ab_0
- xz=5.2.6=h166bdaf_0
we can see that some version of pip (pip=24.0=pyhd8ed1ab_0) is installed, along with other packages.
In all cases we will use pip, the PyPI package manager, that comes packages with Python. Make sure that in each case you start with an empty environment with only Python installed.
Installing all dependencies on a venv environment
The simplest option is to install all the required packages in a venv virtual environment. Start by creating an environment with the venv module of the Python installed in the mkdocs-python environment:
micromamba run --name mkdocs-python python -m venv ~/environments/mkdocs
Activate the environment,
$ source ~/environment/mkdocs/bin/active
and export the environment specification,
(mkdocs) $ pip freeze
which should result in no output since we have not installed ant packages yet. Some infrastructure packages are installed in the environment by default, all installed packages can be printed with the command pip list,
(mkdocs) $ pip list --format=freeze
pip==24.0
where the --format option selected ensures that the output if produced in a YAML file format. We can see that in the environment there is the pip package installed. Infrastructure packages are not version tracked as they are required only for pip, and not for packages provided by the environment.
With the venv environment active, install the packages:
(mkdocs) $ pip install --upgrade mkdocs mkdocs-minify-plugin
Now the pip freeze command should print all the installed packages:
(mkdocs) $ pip freeze
click==8.1.7
csscompressor==0.9.5
ghp-import==2.1.0
htmlmin2==0.1.13
Jinja2==3.1.3
jsmin==3.0.1
Markdown==3.6
MarkupSafe==2.1.5
mergedeep==1.3.4
mkdocs==1.5.3
mkdocs-minify-plugin==0.8.0
packaging==24.0
pathspec==0.12.1
platformdirs==4.2.0
python-dateutil==2.9.0.post0
PyYAML==6.0.1
pyyaml_env_tag==0.1
six==1.16.0
watchdog==4.0.0
Again, the only difference with the pip list command is that the package for pip is self is not listed.
Overall, installing the required packages in a separate venv virtual Python environment is the simplest solution. There is a distinction between the packages managed by the Conda package manager and pip, with Conda managing only the Python distribution, and pip managing the environment packages and the pip installation. However, this distinction comes at the cost of replicating package installations, as unlike Conda, package files are not share in venv virtual Python environments.
Installing all dependencies from PyPI with pip on the Conda environment
The pip package manager is in fact able to install packages directly on the Conda environment! When the Conda environment is active, the system environment for pip is the Conda environment. Activate the Conda environment, and list the packages with pip:
$ micromamba activate mkdocs-coda
(mkdocs-conda) $ pip list --format=freeze
pip==24.0
setuptools==69.2.0
wheel==0.43.0
Note that we use the list command instead of the freeze command to export all packages. We observe that the packages
pip,setuptools, andwheel,
are installed with the Conda package manager, and are also visible in the output of micromamba env export.
Do not mix package management tools! Packages installed with the Conda package manager should be managed with Conda, and package installed with pip should be managed with pip. All the packages listed so far are installed with the Conda package manager and should not be updated or otherwise altered with pip.
Now install the mkdocs and mkdocs-minify-plugin with pip while the mkdocs-conda environment is active:
(mkdocs-conda) $ pip install --upgrade mkdocs mkdocs-minify-plugin
Now all the dependencies are installed in the Conda environment, and can be listed with:
(mkdocs-conda) $ pip list --format=freeze
$ pip list --format=freeze
click==8.1.7
csscompressor==0.9.5
ghp-import==2.1.0
htmlmin2==0.1.13
Jinja2==3.1.3
jsmin==3.0.1
Markdown==3.6
MarkupSafe==2.1.5
mergedeep==1.3.4
mkdocs==1.5.3
mkdocs-minify-plugin==0.8.0
packaging==24.0
pathspec==0.12.1
pip==24.0
platformdirs==4.2.0
python-dateutil==2.9.0.post0
PyYAML==6.0.1
pyyaml_env_tag==0.1
setuptools==69.2.0
six==1.16.0
watchdog==4.0.0
wheel==0.43.0
Note that Conda is aware of which packages is meant to manage, listing the Conda packages
(mkdics-conda) $ micromamba env export --name mkdocs-conda
name: mkdocs-conda
channels:
- conda-forge
dependencies:
- _libgcc_mutex=0.1=conda_forge
- _openmp_mutex=4.5=2_gnu
- bzip2=1.0.8=hd590300_5
- ca-certificates=2024.2.2=hbcca054_0
- ld_impl_linux-64=2.40=h41732ed_0
- libexpat=2.6.2=h59595ed_0
- libffi=3.4.2=h7f98852_5
- libgcc-ng=13.2.0=h807b86a_5
- libgomp=13.2.0=h807b86a_5
- libnsl=2.0.1=hd590300_0
- libsqlite=3.45.2=h2797004_0
- libuuid=2.38.1=h0b41bf4_0
- libxcrypt=4.4.36=hd590300_1
- libzlib=1.2.13=hd590300_5
- ncurses=6.4.20240210=h59595ed_0
- openssl=3.2.1=hd590300_1
- pip=24.0=pyhd8ed1ab_0
- python=3.12.2=hab00c5b_0_cpython
- readline=8.2=h8228510_1
- setuptools=69.2.0=pyhd8ed1ab_0
- tk=8.6.13=noxft_h4845f30_101
- tzdata=2024a=h0c530f3_0
- wheel=0.43.0=pyhd8ed1ab_0
- xz=5.2.6=h166bdaf_0
we can see that the packages managed by Conda have not changed!
Updating such a combined environment can be tricky. Start by updating all the Conda packages with
micromamba update --name mkdocs-conda --all
and then active the environment and update all the packages managed by pip one by one. Note that with the Conda environment active
- packages that appear in the output of
micromamba env exportandpip list --format=freezeare managed by Conda, and - packages that appear in the output of
pip list --format=freezeare managed bypip.
Some Conda package managers integrate some function of the pip interface. For instance, recreating the same environment with official Conda package manager, conda, the packages exported are:
$ conda env export --name mkdocs-python
name: mkdocs-python
channels:
  - conda-forge
  - nodefaults
dependencies:
  - _libgcc_mutex=0.1=conda_forge
  - _openmp_mutex=4.5=2_gnu
  - bzip2=1.0.8=hd590300_5
  - ca-certificates=2024.2.2=hbcca054_0
  - ld_impl_linux-64=2.40=h41732ed_0
  - libexpat=2.6.2=h59595ed_0
  - libffi=3.4.2=h7f98852_5
  - libgcc-ng=13.2.0=h807b86a_5
  - libgomp=13.2.0=h807b86a_5
  - libnsl=2.0.1=hd590300_0
  - libsqlite=3.45.2=h2797004_0
  - libuuid=2.38.1=h0b41bf4_0
  - libxcrypt=4.4.36=hd590300_1
  - libzlib=1.2.13=hd590300_5
  - ncurses=6.4.20240210=h59595ed_0
  - openssl=3.2.1=hd590300_1
  - pip=24.0=pyhd8ed1ab_0
  - python=3.12.2=hab00c5b_0_cpython
  - readline=8.2=h8228510_1
  - setuptools=69.2.0=pyhd8ed1ab_0
  - tk=8.6.13=noxft_h4845f30_101
  - tzdata=2024a=h0c530f3_0
  - wheel=0.43.0=pyhd8ed1ab_0
  - xz=5.2.6=h166bdaf_0
  - pip:
      - click==8.1.7
      - csscompressor==0.9.5
      - ghp-import==2.1.0
      - htmlmin2==0.1.13
      - jinja2==3.1.3
      - jsmin==3.0.1
      - markdown==3.6
      - markupsafe==2.1.5
      - mergedeep==1.3.4
      - mkdocs==1.5.3
      - mkdocs-minify-plugin==0.8.0
      - packaging==24.0
      - pathspec==0.12.1
      - platformdirs==4.2.0
      - python-dateutil==2.9.0.post0
      - pyyaml==6.0.1
      - pyyaml-env-tag==0.1
      - six==1.16.0
      - watchdog==4.0.0
prefix: /home/gkaf/micromamba/envs/conda/envs/mkdocs-python
Note that in this output, conda package manager indicates correctly that the packages pip, wheel, and setuptools are managed by conda. Creating a clean environment with the resulting YAML file using the --file option will install the pip packages as well. Even though Micromamba does not support exporting the pip installed dependencies, it supports importing files with pip dependencies for compatibility.
Despite any integration that conda offers for exporting pip installed packages, it is still the responsibility of the user to ensure that packages are managed with the correct package manager.
Mixing packages from Conda channels and PyPI
The mkdocs package is quite popular and as a result it is available through the conda-forge Conda channel. At the time of writing, the package mkdocs-minify-plugin is only available though PyPI. Given that the version on mkdocs in conda-forge is compatible with the version of mkdocs-minify-plugin in PyPI, you may consider installing the mkdocs from conda-forge, and mkdocs-minify-plugin from PyPI.
Start by creating an empty Conda environment for Python, and install Python:
$ micromamba create --name mkdocs-conda
$ micromamba install --name mkdocs-conda conda-forge::python
Then, install mkdocs from the conda-forge channel in the mkdocs-conda environment:
$ micromamba install --name mkdocs-conda conda-forge::mkdocs
You have now installed mkdocs through the conda-forge channel in the Conda environment. There are now 2 options for installing mkdocs-minify-plugin from PyPI, you can install it
- in the Conda environment from PyPI with
pip, or - in an isolated
venvvirtual Python environment.
The option of installing packages from PyPI in a Conda environment has already been discussed in the previous section. The most interesting option is installing mkdocs-minify-plugin in a venv that has access to the Conda environment package mkdocs.
Create a vanv that has access to system packages with the command:
$ micromamba run --name mkdocs-conda python -m venv --system-site-packages ~/environments/mkdocs
The resulting configuration configuration file
$ cat ~/environments/mkdocs/pyvenv.cfg
home = /home/gkaf/micromamba/envs/mkdocs-conda/bin
include-system-site-packages = true
version = 3.12.2
executable = /home/gkaf/micromamba/envs/mkdocs-conda/bin/python3.12
command = /home/gkaf/micromamba/envs/mkdocs-conda/bin/python -m venv --system-site-packages /home/gkaf/environments/mkdocs
has the include-system-site-packages option enabled. Activate the environment and export the environment setup:
$ source ~/environments/mkdocs/bin/activate
(mkdocs) $ pip freeze
click @ file:///home/conda/feedstock_root/build_artifacts/click_1692311806742/work
colorama @ file:///home/conda/feedstock_root/build_artifacts/colorama_1666700638685/work
ghp-import @ file:///home/conda/feedstock_root/build_artifacts/ghp-import_1651585738538/work
importlib_metadata @ file:///home/conda/feedstock_root/build_artifacts/importlib-metadata_1710971335535/work
Jinja2 @ file:///home/conda/feedstock_root/build_artifacts/jinja2_1704966972576/work
Markdown @ file:///home/conda/feedstock_root/build_artifacts/markdown_1710435156458/work
MarkupSafe @ file:///home/conda/feedstock_root/build_artifacts/markupsafe_1706899920239/work
mergedeep @ file:///home/conda/feedstock_root/build_artifacts/mergedeep_1612711302171/work
mkdocs @ file:///home/conda/feedstock_root/build_artifacts/mkdocs_1695086541719/work
packaging @ file:///home/conda/feedstock_root/build_artifacts/packaging_1710075952259/work
pathspec @ file:///home/conda/feedstock_root/build_artifacts/pathspec_1702249949303/work
platformdirs @ file:///home/conda/feedstock_root/build_artifacts/platformdirs_1706713388748/work
python-dateutil @ file:///home/conda/feedstock_root/build_artifacts/python-dateutil_1709299778482/work
PyYAML @ file:///home/conda/feedstock_root/build_artifacts/pyyaml_1695373450623/work
pyyaml_env_tag @ file:///home/conda/feedstock_root/build_artifacts/pyyaml-env-tag_1624388951658/work
setuptools==69.2.0
six @ file:///home/conda/feedstock_root/build_artifacts/six_1620240208055/work
typing_extensions @ file:///home/conda/feedstock_root/build_artifacts/typing_extensions_1708904622550/work
watchdog @ file:///home/conda/feedstock_root/build_artifacts/watchdog_1707295114593/work
wheel==0.43.0
zipp @ file:///home/conda/feedstock_root/build_artifacts/zipp_1695255097490/work
The freeze command now list the packages that are provided by the environment and the packages that are provided by the system which in our case is our Conda environment.
To recreate the environment from a YAML file with the environment specifications,
- enable the
include-system-site-packagesoption during the creation of the new environment, and - when installing the packages from the YAML file, ensure that all the dependences are located in the path mentioned in the specification file.
Despite the face that the package manager exports the dependencies correctly, the user is still responsible for using the correct tool to manage the packages. Listing all the packages in the environment,
(mkdocs) $ pip list --format=freeze
click==8.1.7
colorama==0.4.6
ghp-import==2.1.0
importlib_metadata==7.1.0
Jinja2==3.1.3
Markdown==3.6
MarkupSafe==2.1.5
mergedeep==1.3.4
mkdocs==1.5.3
packaging==24.0
pathspec==0.12.1
pip==24.0
platformdirs==4.2.0
python-dateutil==2.9.0
PyYAML==6.0.1
pyyaml_env_tag==0.1
setuptools==69.2.0
six==1.16.0
typing_extensions==4.10.0
watchdog==4.0.0
wheel==0.43.0
zipp==3.17.0
we can see that pip lists all the packages irrespective of whether they are installed in the environment of the system. The advantage of using a venv however, is that any change made with pip will be local to the venv and will simply override without altering the Conda installation.
Combining Conda with pip to install a Python source package
Let's consider the installation of the PySPQR module that wraps the SuiteSparseQR decomposition function for use with SciPy. Installing this software is challenging because
- the PySPQR package is not available through Conda channels, and
- installing PySPQR (
sparseqr) directly in avenvfails.
The PySPQR package is a source code package and its installation in a venv requires linking with the SuiteSparse library. We can install SparseSuite in our system (e.g. apt-get install libsuitesparse-dev in Debian), but we will avoid modifying system libraries and use a Conda environment instead.
A Conda environment is a directory with packages where you can install anything you need with a compatible package manager like Micromamba. Create an environment with all the required dependencies:
$ micromamba env create --name python-suitesparse
$ micromamba install conda-forge::python conda-forge::suitesparse --name python-suitesparse
The package conda-forge::suitesparse is effectively what apt-get install libsuitesparse-dev installs globally in a Deabian based system, but now it is only available in the Conda environment python-suitesparse.
You are not going to use python-suitesparse directly though! You will use the Python installed in python-suitesparse to create a venv where you will install sparseqr.
Create a venv with the Python of python-suitesparse like this:
$ micromamba run --name python-suitesparse python -m venv ~/environments/PySPQR
This will create a venv in ~/environments/PySPQR, and since it is created with the python of the python-suitesparse Conda environment, SuiteSparse is now available inside the environment.
Activate your new environment, and install sparseqr with any method you prefer, I have chosen to use the PyPI repo:
$ source ~/environments/PySPQR/bin/activate
(PySPQR) $ pip install --upgrade setuptools sparseqr
(PySPQR) $ python
>>> import sparseqr
Note that setuptools is also required and must be installed manually in a venv since PySPQR is a source package.
N.B. When installing source packages from PyPI ensure that setuptools is available in your environment. The setuptools library is used to package Python projects, and it is required by source packages to build the source code.
After the first Python import command, your package should compile successfully. After that, the package should be available for import without the need to compile again.
For future use activate the venv environment with
$ source ~/environments/PySPQR/bin/activate
and deactivate with
(PySPQR) $ deactivate
Managing packages in R
The R program has a built-in package manager. Assuming that you have access to an installation of R, the R system contains 2 utilities that allow the installation of packages in 3 different modes. First, there is the built-in package manager that can instal packages
- in system wide accessible locations for packages that should be available to all users (requires elevated privileges), or
- in user specific location for packages that are accessible to the current user only.
There are default locations where the built-in package manager searches for packages. The user specific locations take precedence over system locations. The package manager search path can be extended by the user to include bespoke locations. There is also the Packrat package manager which installs packages
- in project directories, with the packages being available in an environment isolated within the project directory.
The Packrat package manager is available as an R package. When creating an environment within a project directory, the environment is activated automatically when starting R in the project directory (but not in its subdirectories due to the implementation of Packrat).
In your local system you can install packages in any mode. In the HPC systems, you can only install packages in the user accessible location, so you are limited to user and project wide installations. Nevertheless, the HPC installation of R includes a number of commonly used packages, such as dbplyr and tidyverse. You should check if the package you require is installed and that the installed version provides the functionality you need before installing any packages locally. Remember, local package installations consume space and inodes against personal or project quota.
Installing R packages locally and globally
Be default R installs packages system wide. When R detects that it does not have write access to the system directories it suggests installing packages for the current user only.
Start and interactive session and then load the R module and start R:
$ module load lang/R
$ R
You can list the directories where R is installing and looking for new packages using the function .libPaths()
> .libPaths()
[1] "/mnt/irisgpfs/apps/resif/aion/2020b/epyc/software/R/4.0.5-foss-2020b/lib64/R/library"
If you haven't installed any libraries, only the system path appears in the path where R is looking for libraries. Now, try installing for instance the Packrat package globally with the install.packages command.
> install.packages(c("packrat"))
Warning in install.packages(c("packrat")) :
  'lib = "/mnt/irisgpfs/apps/resif/aion/2020b/epyc/software/R/4.0.5-foss-2020b/lib64/R/library"' is not writable
Would you like to use a personal library instead? (yes/No/cancel) yes
Would you like to create a personal library
‘~/R/x86_64-pc-linux-gnu-library/4.0’
to install packages into? (yes/No/cancel) yes
--- Please select a CRAN mirror for use in this session ---
Secure CRAN mirrors
Select any mirror apart from 1: 0-Cloud [https]; usually mirrors closer to your physical location will provide better bandwidth. After selecting a mirror the download and installation of the package proceeds automatically.
Note that after failing to install the package in the system directory, R creates an installation directory for the user in their home directory ~/R/x86_64-pc-linux-gnu-library/4.0 and installs the package for the user only. After the installation, you can check the path where R is looking for packages again.
> .libPaths()
[1] "/mnt/irisgpfs/users/<user name>/R/x86_64-pc-linux-gnu-library/4.0"
[2] "/mnt/irisgpfs/apps/resif/aion/2020b/epyc/software/R/4.0.5-foss-2020b/lib64/R/library"
Now R will look for packages in the user directory first (/mnt/irisgpfs is another path for /home that appears in the ${HOME} variable). Note by the naming convention that R uses when it creates the directory for installing user packages, you can have multiple minor versions of R installed, and their packages will not interfere with each other. For instance,
- R version 4.0.5 installs packages in
~/R/x86_64-pc-linux-gnu-library/4.0, and - R version 4.3.2 installs packages in
~/R/x86_64-pc-linux-gnu-library/4.3.
Some useful commands for managing packages are,
installed.packages()to list installed packages and various information regarding each package installation,old.packages()to list outdated packages,update.packages()to update installed packages, andremove.packages(c("packrat"))to remove packages.
To list the loaded packages, use the command
search()
and to get a detailed description of the environment, use the command
sessionInfo()
which provides information about the version of R, the OS, and loaded packages.
To load a library that has been installed use the command library. For instance,
library(packrat)
where you cam notice that the use of quotes is optional and only a single can be loaded at a time. The library function causes an error when the loading of a package fails, so R provides the function require which returns the status of the package loading operation in a return variable, and is design for use inside R functions.
Useful resources
Configuring installation paths in R
So far we have only used the default installation paths of R. However, in a local installation where the user has rights to install in the system directories (e.g. in a Conda environment with R) the user installation directory is not created automatically. Open an R session in an interactive session in the HPC cluster or in your personal machine. To get the location where user packages are installed call
> Sys.getenv("R_LIBS_USER")
[1] "/home/<user name>/R/x86_64-conda-linux-gnu-library/4.3"
which will print an environment variable, R_LIBS_USER, which is set by R and stores the default location for storing user packages. If you create the directory with
$ mkdir -p /home/<user name>/R/x86_64-conda-linux-gnu-library/4.3
then you can print the locations where R is searching for packages (after reloading R), and the default location should appear first in the list. For instance for o Conda installation of R using the Micromamba package manager, the paths printed are
> .libPaths()
[1] "/home/<user name>/R/x86_64-conda-linux-gnu-library/4.3"
[2] "/home/<user name>/micromamba/envs/R/lib/R/library"
where R is installed in a Conda environment named R in the second entry of the search path.
There are now multiple locations where packages are stored. The location used by default is the first in the list. Thus, after creating the default location for user installed packages, packages are installed by default in user wide mode. For instance, installing the Packrat package,
> install.packages(c("packrat"))
listing the user installation directory
$ ls "/home/<user name>/R/x86_64-conda-linux-gnu-library/4.3"
packrat
will show the directory with the installed Packrat package files. To install the package in a system wide installation, use the libflag
> install.packages(c("packrat"), lib="/home/<user name>/micromamba/envs/R/lib/R/library")
to specify the installation location. During loading, all directories in the path are searched consecutively until the package is located.
The package installation paths can also be used to maintain multiple independent environments in R. For instance, you can maintain a personal environment and project environment for your research group. Lets consider the case where you want the create an environment in a project directory. First, create a directory for the R environment
$ mkdir -p "${PROJECTHOME}<project name>/R-environment"
where the variable PROJECTHOME is defined in the UL HPC system environment to point to the home of the project directories (and includes a trailing slash '/'). To install a package in the project environment, call the installation function with the appropriate lib argument
> install.packages( c("packrat"), lib=paste0( Sys.getenv("PROJECTHOME"), "<project name>/", "R-environment" ) )
and follow the typical instructions. To load the package, you now must also specify the location of the library,
> library( packrat, lib.loc=paste0( Sys.getenv("PROJECTHOME"), "<project name>/", "R-environment" ) )
similar to the installation. Environment options can be used to extent the library paths and avoid having to specify the library path in each command.
A startup file mechanism is provided by R to set up user and project wide environment options. There are 2 kinds of file,
.Renvironfiles used to set-up environment variables for R, and.Rprofilefiles used to run any R code during initialization.
Note that .Renviron files are simply a list of
key=value
assignment pairs which are read by R, not proper bash code (adding an export modifier is a syntax error). There are 2 locations where startup files appear,
- the home directory,
~/.Renvironand~/.Rprofile, for user wide settings, and - project directories for project wide settings.
The definitions in project .Rprofile files override the user wide definitions in ~/.Rprofile. The definitions in .Renviron files supersede the definitions in ~/.Renviron, that is if the project has an environment file, the user wide definitions are ignored. Note that R is designed to source setup files at the directory where R starts, and any setup files in parent or descendent directories are ignored.
Both the profile and environment startup files can setup a user wide environment. For instance, to use an environment setup in the project directories of the UL HPC systems add in the user wide environment setup file, ~/.Renviron, the entry
R_LIBS=${PROJECTHOME}<project name>/R-environment
and then reload R. The new library path is
> .libPaths()
[1] "/mnt/irisgpfs/projects/<project name>/R-environment"
[2] "/mnt/irisgpfs/users/<user name>/R/x86_64-pc-linux-gnu-library/4.0"
[3] "/mnt/irisgpfs/apps/resif/iris-rhel8/2020b/broadwell/software/R/4.0.5-foss-2020b/lib64/R/library"
assuming that all directories appearing in the path exist. Note that the setup file options precede any default options.
We can also use startup files to setup project wide libraries. For instance, assume that we are working on a project in a directory named project and the R packages are stored in a subdirectory R-environment. We use a project profile, to still be able to use any library paths defined in the user wide environment file. Add in a file project/.Rprofile the following definitions,
project_path <- paste0( getwd(), "/R-environment" )
newpaths <- c( project_path, .libPaths() )
.libPaths( newpaths )
and then start R in the project directory. The new library path is
> .libPaths()
[1] "/mnt/irisgpfs/users/<user name>/Documents/project/R-environment"
[2] "/mnt/irisgpfs/projects/<project name>/R-environment"
[3] "/mnt/irisgpfs/users/<user name>/R/x86_64-pc-linux-gnu-library/4.0"
[4] "/mnt/irisgpfs/apps/resif/iris-rhel8/2020b/broadwell/software/R/4.0.5-foss-2020b/lib64/R/library"
were the local project settings override the user and system wide settings. This is effectively a local project environment.
Installing packages in R project directories with Packrat
The Packrat library is used to automate the creation and management of project based environments. Packrat also automates operations such as tracking the version of the packages installed in the environment with snapshots, and saving the snapshot information in a text file that can be version controlled. The R distribution available through the UL HPC modules has a fairly old version of Packrat, which nevertheless supports all the basic features. Packrat is a light package, so you can install a more modern version in a user wide mode or in some environment accessible to all the users of a UL HPC project.
To initialize the project, for instance in the directory ~/Documents/project, use the commands:
library(packrat)
packrat::init("~/Document/project")
The initialization command creates,
- a directory ~/Document/project/packrat to store the packages, and
- a setup script ~/Document/project/.Rprofile to initialize the project.
Therefore, start R within the project directory ~/Document/packrat, to activate the project environment. After initializing the project or whenever you start R in the project directory, the packrat directory and its subdirectories will be the only ones appearing in the library paths:
> .libPaths()
[1] "/mnt/irisgpfs/users/<user name>/Documents/project/packrat/lib/x86_64-pc-linux-gnu/4.0.5"
[2] "/mnt/irisgpfs/users/<user name>/Documents/project/packrat/lib-ext/x86_64-pc-linux-gnu/4.0.5"
[3] "/mnt/irisgpfs/users/<user name>/Documents/project/packrat/lib-R/x86_64-pc-linux-gnu/4.0.5"
Execute all package operations as usual. For instance, to install the plyr package, use the command:
> install.packages(c("plyr"))
All packages are stored in the packrat subdirectory of the project.
Packrat stores the status of the project in the file packrat/packrat.lock. This file stores the precise package versions that were used to satisfy dependencies, including dependencies of dependencies, and should not be edited by hand. After any change in the installed packages run the command
packrat::snapshot()
to update the file. You can use the command
packrat::status()
to analyze the code in the project directory and get a report regarding the status of extraneous or missing packages. After running the status command, you can run
packrat::clean()
to remove any unused packages. Finally, after restoring the packrat/packrat.lock file from a version control system, or if status detects a missing package, use the command
packrat::restore()
to install any missing packages.
Useful resources
Issues with managing packages with the native R package managers
The native package manager of R is quite potent, and there are packages such as Packrat that further extend its capabilities. However, there are some drawbacks in installing packages with the native tools. Consider for instance installing the hdf5r package, a package used to read and write binary files, that is quite popular in HPC engineering applications. The installation mode is not important for our demonstration purposes, but assume that you are performing a user wide installation.
> install.packages(c("hdf5r"))
During the installation, you can see that R is compiling the package components. This can be advantageous is the compilation process is tailored to optimize the build for the underlying system configuration. If you use the module available in the UL HPC systems, it is configured to use the main components of the FOSS tool chain (you can see that by calling module list after loading R), so the compiled packages are well optimized.
N.B. If you encounter any issues with missing packages load the whole FOSS tool chain module with the command,
module load toolchain/foss
as there are a few popular packages missing in the dependencies of R.
However, if you want to avoid compiling packages from source, which can be quite time consuming, you can use binary distributions of R. These include the distributions provided though native package managers in various Linux distributions, like APT and YUM, as well as Conda package managers like Mamba.