![]()
![]()

![]()
![]()

Bioinformatics workflows with snakemake and conda
Copyright (c) 2019 UL HPC Team <hpc-sysadmins@uni.lu>
Author: Sarah Peter

In this tutorial you will learn how to run a ChIP-seq analysis with the snakemake workflow engine on the cluster.
Disclaimer: In order to keep this tutorial simple, we use default parameters for the different tools as much as possible. However, for a real analysis you should always adapt the parameters to your dataset. Also, be aware that the results of some steps might be skewed, because we only work on data from one chromosome.
Note: To make it clear where you should execute a certain command, the prompt is prefixed with the location, i.e.
(access)$>for commands on the cluster access nodes(node)$>for commands on a cluster node inside a job(laptop)$>for commands locally on your machine
The actual command comes only after this prefix.
Table of contents
- Setup the environment
- Create snakemake workflow
- Cluster configuration for snakemake
- Inspect results in IGV
- (Optional) Immediately submit all jobs
- (Optional) Revert the changes to your environment
- Useful stuff
- References
- Acknowledgements
Setup the environment
For this tutorial we will use the conda package manager to install the required tools.
Conda is an open source package management system and environment management system that runs on Windows, macOS and Linux. Conda quickly installs, runs and updates packages and their dependencies. Conda easily creates, saves, loads and switches between environments on your local computer. It was created for Python programs, but it can package and distribute software for any language.
Conda as a package manager helps you find and install packages. If you need a package that requires a different version of Python, you do not need to switch to a different environment manager, because conda is also an environment manager. With just a few commands, you can set up a totally separate environment to run that different version of Python, while continuing to run your usual version of Python in your normal environment.
It can encapsulate software and packages in environments, so you can have multiple different versions of a software installed at the same time and avoid incompatibilities between different tools. It also has functionality to easily port and replicate environments, which is important to ensure reproducibility of analyses.
Attention when dealing with sensitive data: Everyone can very easily contribute installation recipies to the bioconda channel, without verified identity or double-checking from the community. Therefore it's possible to insert malicious software. If you use bioconda when processing sensitive data, you should check the recipes to verify that they install software from the official sources.
We will use conda on two levels in this tutorial. First, we use a conda environment to install and run snakemake. Second, inside the snakemake workflow we will define separate conda environments for each step.
1. Connect to the cluster
2. Start an interactive job
(access)$> si
3. Install conda
(node)$> mkdir -p $SCRATCH/downloads
(node)$> cd $SCRATCH/downloads
(node)$> wget https://repo.anaconda.com/miniconda/Miniconda3-latest-Linux-x86_64.sh
(node)$> chmod u+x Miniconda3-latest-Linux-x86_64.sh
(node)$> ./Miniconda3-latest-Linux-x86_64.sh
You need to specify your installation destination, e.g. /home/users/<your_username>/tools/miniconda3. You must use the full path and cannot use $HOME/tools/miniconda3. Answer yes to initialize Miniconda3.
The installation will modify your .bashrc to make conda directly available after each login. To activate the changes now, run
(node)$> source ~/.bashrc
Update conda to the latest version:
(node)$> conda update conda
4. Create a new conda environment and activate it
(node)$> conda create -n bioinfo_tutorial
(node)$> conda activate bioinfo_tutorial
After validation of the creation step and once activated, you can see that your prompt will now be prefixed with (bioinfo_tutorial) to show which environment is active. For the rest of the tutorial make sure that you always have this environment active.
5. Make sure Python does not pick up packages in your home directory
First we do a backup of the .bashrc before we modify it:
(bioinfo_tutorial) (node)$> cp ~/.bashrc ~/.bashrc-$(date +%Y%m%d).bak
Then we add export PYTHONNOUSERSITE=True :
(bioinfo_tutorial) (node)$> cat << EOF >> ~/.bashrc

# Stop Python from picking up packages in $HOME/.local
export PYTHONNOUSERSITE=True
EOF
For the later parts of this tutorial to work, we need to make this setting permanent by adding it to .bashrc. However, make sure to delete those lines after the tutorial, so your manually installed python packages are found again.
6. Install snakemake
(bioinfo_tutorial) (node)$> conda install -c bioconda -c conda-forge snakemake-minimal
Create snakemake workflow
The Snakemake workflow management system is a tool to create reproducible and scalable data analyses. Workflows are described via a human readable, Python based language. They can be seamlessly scaled to server, cluster, grid and cloud environments, without the need to modify the workflow definition. Finally, Snakemake workflows can entail a description of required software, which will be automatically deployed to any execution environment.
Snakemake is a very useful tool if you need to combine multiple steps using different software into a coherent workflow. It comes with many features desired for running workflows, like
- ensuring all input and result files are present
- restarting at a failed step
- rerunning (parts of a) pipeline when (some of) the input changed
- support for wildcards to apply a step to a set of files
- automatically parallelising where possible
- software management
- collecting benchmark data
- modularisation
- creating launcher scripts and submitting jobs to the cluster
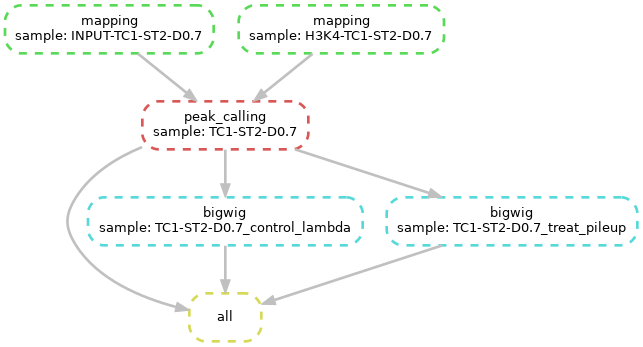
- creating a visualisation of the workflow steps (see below)
In this tutorial we will analyse ChIP-seq data from the paper Gérard D, Schmidt F, Ginolhac A, Schmitz M, Halder R, Ebert P, Schulz MH, Sauter T, Sinkkonen L. Temporal enhancer profiling of parallel lineages identifies AHR and GLIS1 as regulators of mesenchymal multipotency. Nucleic Acids Research, Volume 47, Issue 3, 20 February 2019, Pages 1141–1163, https://doi.org/10.1093/nar/gky1240 published by our colleagues at LSRU.
We will set up the following workflow:
To speed up computing time we use source files that only contain sequencing reads that map to chromosome 12. The files for input (control) and H3K4me3 (ChIP) are available on the cluster in the directory /work/projects/ulhpc-tutorials/bio/snakemake/chip-seq and the corresponding reference in /work/projects/ulhpc-tutorials/bio/snakemake/reference.
We have also already prepared the conda environments for each step in the workflow in /work/projects/ulhpc-tutorials/bio/snakemake/envs.
Create a working directory and link the necessary data:
(node)$> cd $SCRATCH
(node)$> mkdir bioinfo_tutorial
(node)$> cd bioinfo_tutorial
(node)$> ln -s /work/projects/ulhpc-tutorials/bio/snakemake/chip-seq .
(node)$> ln -s /work/projects/ulhpc-tutorials/bio/snakemake/reference .
(node)$> ln -s /work/projects/ulhpc-tutorials/bio/snakemake/envs .
Mapping
In Snakemake, workflows are specified as Snakefiles. Inspired by GNU Make, a Snakefile contains rules that denote how to create output files from input files. Dependencies between rules are handled implicitly, by matching filenames of input files against output files. Thereby wildcards can be used to write general rules.
— Snakemake manual - Writing Workflows
Most importantly, a rule can consist of a name (the name is optional and can be left out, creating an anonymous rule), input files, output files, and a shell command to generate the output from the input, i.e.
rule NAME:
    input: "path/to/inputfile", "path/to/other/inputfile"
    output: "path/to/outputfile", "path/to/another/outputfile"
    shell: "somecommand {input} {output}"
For a detailed explanation of rules, have a look at the official Snakemake tutorial.
A basic rule for mapping a fastq file with bowtie2 could look like this:
rule mapping:
  input: "chip-seq/H3K4-TC1-ST2-D0.12.fastq.gz"
  output: "bowtie2/H3K4-TC1-ST2-D0.12.bam"
  shell:
    """
    bowtie2 -x reference/Mus_musculus.GRCm38.dna_sm.chromosome.12 -U {input} | \
    samtools sort - > {output}
    samtools index {output}
    """
Since we have two fastq files to map, we should generalise the rule with wildcards:
rule mapping:
  input: "chip-seq/{sample}.fastq.gz"
  output: "bowtie2/{sample}.bam"
  shell:
    """
    bowtie2 -x reference/Mus_musculus.GRCm38.dna_sm.chromosome.12 -U {input} | \
    samtools sort - > {output}
    samtools index {output}
    """
Now we need to tell snakemake to use a conda environment with bowtie2 and samtools inside to run this rule. For this purpose there is a specific conda directive that can be added to the rule. It accepts a yaml file that defines the conda environment.
conda: "envs/bowtie2.yaml"
You can easily export existing conda environments to a yaml file with conda env export or write the yaml from scratch. For this step the yaml file looks like this:
name: bowtie2
channels:
  - bioconda
dependencies:
  - bowtie2
  - samtools
We also use the params directive to define the path to the reference and declutter the command-line call, as well as the log directive to define a path to permanently store the output of the execution. This is especially useful in this step to store the bowtie2 mapping statistics, which are just written to the command-line (stderr) otherwise.
To track resource usage we add the benchmark directive, which will write performance measures to a tsv file.
Create a file called Snakefile in the current directory and open it in your favourite editor, e.g.
(node)$> nano Snakefile
Add the final rule for the mapping:
rule mapping:
  input: "chip-seq/{sample}.fastq.gz"
  output: "bowtie2/{sample}.bam"
  params:
    idx = "reference/Mus_musculus.GRCm38.dna_sm.chromosome.12"
  log: "logs/bowtie2_{sample}.log"
  benchmark: "benchmarks/mapping/{sample}.tsv"
  conda: "envs/bowtie2.yaml"
  shell:
    """
    bowtie2 -x {params.idx} -U {input} 2> {log} | \
    samtools sort - > {output}
    samtools index {output}
    """
You can test the rule by specifying one of the potential outputs. We first do a dry-run with with option -n.
(node)$> snakemake -npr --use-conda bowtie2/INPUT-TC1-ST2-D0.12.bam
If everything is fine we can run the rule to create the file bowtie2/INPUT-TC1-ST2-D0.12.bam:
(node)$> snakemake -pr --use-conda bowtie2/INPUT-TC1-ST2-D0.12.bam
The first run will take a bit longer, because snakemake creates the conda environment. In subsequent runs it will just activate the existing environment. However, it will recognise if the yaml files changes and then recreate the environment.
Check the mapping statistics and the benchmark report:
(node)$> cat logs/bowtie2_INPUT-TC1-ST2-D0.12.log
400193 reads; of these:
  400193 (100.00%) were unpaired; of these:
    1669 (0.42%) aligned 0 times
    379290 (94.78%) aligned exactly 1 time
    19234 (4.81%) aligned >1 times
99.58% overall alignment rate

(node)$> cat benchmarks/mapping/INPUT-TC1-ST2-D0.12.tsv
s       h:m:s   max_rss max_vms max_uss max_pss io_in io_out mean_load
19.1737 0:00:19 262.14  1404.55 258.79  258.94  0.00  0.00   0.00
After this step your working directory should contain the following files (using the tree command):
.
|-- benchmarks
|   `-- mapping
|       `-- INPUT-TC1-ST2-D0.12.tsv
|-- bowtie2
|   |-- INPUT-TC1-ST2-D0.12.bam
|   `-- INPUT-TC1-ST2-D0.12.bam.bai
|-- chip-seq -> /work/projects/ulhpc-tutorials/bio/snakemake/chip-seq
|-- envs -> /work/projects/ulhpc-tutorials/bio/snakemake/envs
|-- logs
|   `-- bowtie2_INPUT-TC1-ST2-D0.12.log
|-- reference -> /work/projects/ulhpc-tutorials/bio/snakemake/reference/
|-- Snakefile
Peak calling
The next step in the workflow is to call peaks with MACS2. This tells us where there is enrichment of the ChIP versus the input (control).
You should always choose the peak caller based on how you expect your enriched regions to look like, e.g. narrow or broad peaks.
Besides the list of peaks in BED format, MACS2 also produces coverage tracks.
Add the following rule to your Snakefile:
rule peak_calling:
  input:
    control = "bowtie2/INPUT-{sample}.bam",
    chip = "bowtie2/H3K4-{sample}.bam"
  output:
    peaks = "output/{sample}_peaks.narrowPeak",
    control_bdg = "macs2/{sample}_control_lambda.bdg",
    chip_bdg = "macs2/{sample}_treat_pileup.bdg"
  conda: "envs/macs2.yaml"
  shell:
    """
    macs2 callpeak -t {input.chip} -c {input.control} -f BAM -g mm -n {wildcards.sample} -B -q 0.01 --outdir macs2

    cp macs2/{wildcards.sample}_peaks.narrowPeak {output.peaks}
    """
The conda environment envs/macs2.yaml for this step is:
name: macs2
channels:
  - bioconda
dependencies:
  - macs2
Let's run this step with:
(node)$> snakemake -pr --use-conda output/TC1-ST2-D0.12_peaks.narrowPeak
Note that snakemake will not run the mapping step for bowtie2/INPUT-TC1-ST2-D0.12.bam again. It only runs rules for which the output is not present or the input has changed.
After this step your working directory should contain the following files:
.
|-- benchmarks
|   `-- mapping
|       |-- H3K4-TC1-ST2-D0.12.tsv
|       `-- INPUT-TC1-ST2-D0.12.tsv
|-- bowtie2
|   |-- H3K4-TC1-ST2-D0.12.bam
|   |-- H3K4-TC1-ST2-D0.12.bam.bai
|   |-- INPUT-TC1-ST2-D0.12.bam
|   `-- INPUT-TC1-ST2-D0.12.bam.bai
|-- chip-seq -> /work/projects/ulhpc-tutorials/bio/snakemake/chip-seq
|-- envs -> /work/projects/ulhpc-tutorials/bio/snakemake/envs
|-- logs
|   |-- bowtie2_H3K4-TC1-ST2-D0.12.log
|   `-- bowtie2_INPUT-TC1-ST2-D0.12.log
|-- macs2
|   |-- TC1-ST2-D0.12_control_lambda.bdg
|   |-- TC1-ST2-D0.12_model.r
|   |-- TC1-ST2-D0.12_peaks.narrowPeak
|   |-- TC1-ST2-D0.12_peaks.xls
|   |-- TC1-ST2-D0.12_summits.bed
|   `-- TC1-ST2-D0.12_treat_pileup.bdg
|-- output
|   `-- TC1-ST2-D0.12_peaks.narrowPeak
|-- reference -> /work/projects/ulhpc-tutorials/bio/snakemake/reference/
|-- Snakefile
Generate bigWig files for visualisation
For easier visualisation and faster transfer, we convert the two coverage tracks from the MACS2 output to bigWig format.
Add the following rule to your Snakefile:
rule bigwig:
  input: "macs2/{sample}.bdg"
  output: "output/{sample}.bigwig"
  params:
    idx = "reference/Mus_musculus.GRCm38.dna_sm.chromosome.12.fa.fai"
  conda: "envs/ucsc.yaml"
  shell:
    """
    bedGraphToBigWig {input} {params.idx} {output}
    """
The conda environment envs/ucsc.yaml for this step is:
name: ucsc
channels:
  - bioconda
dependencies:
  - ucsc-bedgraphtobigwig
Let's test this step with:
(node)$> snakemake -pr --use-conda output/TC1-ST2-D0.12_treat_pileup.bigwig
This time snakemake will only run the "bigwig" rule for the one file we specified.
After this step the output directory should contain the following files:
TC1-ST2-D0.12_peaks.narrowPeak
TC1-ST2-D0.12_treat_pileup.bigwig
Summary rule
To avoid always having to specify which output file we want on the command-line, we add one rule with just inputs that defines the result files we want to have in the end. Since by default snakemake executes the first rule in the snakefile, we add this rule as the first one to the top and then we don't need to specify anything additional on the command-line.
First, at the very top of the Snakefile, define a variable for the name of the sample:
SAMPLE = "TC1-ST2-D0.12"
This makes it easier to change the Snakefile and apply it to other datasets. Snakemake is based on Python so we can use Python code inside the Snakefile. We will use f-Strings to include the variable in the file names.
Add this rule at the top of the Snakefile after the line above:
rule all:
  input: f"output/{SAMPLE}_peaks.narrowPeak", f"output/{SAMPLE}_control_lambda.bigwig", f"output/{SAMPLE}_treat_pileup.bigwig"
Finally run the workflow again, this time without a specific target file:
(node)$> snakemake --use-conda -pr
After this step the output directory should contain the following files:
TC1-ST2-D0.12_control_lambda.bigwig
TC1-ST2-D0.12_peaks.narrowPeak
TC1-ST2-D0.12_treat_pileup.bigwig
Snakemake can visualise the dependency graph of the workflow with the following command:
(node)$> snakemake --dag | dot -Tpdf > dag.pdf
Cluster configuration for snakemake
Until now the workflow just runs on a single CPU on a single machine, which is not very efficient when we have much more resources available. To speed up the computation you should check in the documentation of the software you use how it can scale. For bioinformatics tools the most common option is multithreading.
In this workflow only bowtie2 has the option to run on multiple threads.
Adjust mapping step to run on multiple threads
We add the thread directive to the snakemake rule for the mapping step, to tell snakemake that this step can use multiple threads.
The specified threads have to be seen as a maximum. When Snakemake is executed with fewer cores, the number of threads will be adjusted, i.e.
threads = min(threads, cores)withcoresbeing the number of cores specified at the command line (option-j).
So the value for threads should be the maximum that is reasonable for the respective software. For many software the speed-up plateaus at a certain number of threads or even starts to decrease again. For a regular bowtie2 run 16 is a good maximum, but for this tutorial we will only go up to 4 because we have a small dataset.
In the mapping rule in your Snakefile add the following line after the conda directive:
threads: 4
We also need to add the option -p {threads} to the bowtie2 command-line call, to make it actually use those threads:
bowtie2 -p {threads} -x {params.idx} -U {input} 2> {log} | \
such that the complete mapping rule now is the following:
rule mapping:
  input: "chip-seq/{sample}.fastq.gz"
  output: "bowtie2/{sample}.bam"
  params:
    idx = "reference/Mus_musculus.GRCm38.dna_sm.chromosome.12"
  log: "logs/bowtie2_{sample}.log"
  benchmark: "benchmarks/mapping/{sample}.tsv"
  conda: "envs/bowtie2.yaml"
  threads: 4
  shell:
    """
    bowtie2 -p {threads} -x {params.idx} -U {input} 2> {log} | \
    samtools sort - > {output}
    samtools index {output}
    """
If we want to rerun the workflow to compare different options, we need to delete the output files, otherwise snakemake will not run the steps again. Fortunately snakemake has a dedicated option for this:
(node)$> snakemake all --delete-all-output
Quit your current job and start a new one with more cores to test the multithreading:
(node)$> exit
(access)$> srun --cpu-bind=none -p interactive -t 0-0:15:0 -N 1 -c 6 --ntasks-per-node=1
(node)$> conda activate bioinfo_tutorial
(node)$> cd $SCRATCH/bioinfo_tutorial
Now we also need to tell snakemake that it has multiple cores available and can run steps multithreaded or run multiple tasks in parallel. This is done with the -j option followed by the number of available cores (e.g. the number of cores you have reserved if you run it interactively).
(node)$> snakemake -j 4 -pr --use-conda bowtie2/INPUT-TC1-ST2-D0.12.bam
You should see in the output that the command-line call of bowtie2 now shows -p 4.
Check again the benchmark report:
(node)$> cat benchmarks/mapping/INPUT-TC1-ST2-D0.12.tsv
s      h:m:s   max_rss max_vms max_uss max_pss io_in io_out mean_load
6.7687 0:00:06 295.01  1728.68 291.64  291.79  0.00  16.00  0.00
Notice that the runtime has decreased, but I/O has increased.
Exercise: Try several options for -j up to the number of cores you reserved (6) and check the bowtie2 command and the values in the benchmark. Don't forget the clean-up between the tries.
Configure job parameters with cluster.yaml
Instead of reserving an interactive job and running snakemake inside that job, we want to use snakemake's cluster functionality to make it submit jobs to Slurm. For this we create a configuration file named cluster.yaml to define the values for the different sbatch options.
Options under the __default__ header apply to all rules, but it's possible to override them selectively with rule-specific options.
Create the file cluster.yaml in the same directory as the Snakefile with the following content:
__default__:
  time: "0-00:01:00"
  partition: "batch"
  nodes: 1
  ntasks: 1
  ncpus: 1
  job-name: "{rule}"
  output: "slurm-%j-%x.out"
  error: "slurm-%j-%x.err"
mapping:
  ncpus: 4
The only settings you may need to change per rule are:
-
time, to adjust to the runtime of the rule, -
ncpus, to adjust to the number of threads specified in the rule, -
maybe
partition, to go tobigmemnodes, for example,
as long as the software you use only does multithreading or doesn't scale at all. With multithreading you cannot run across multiple nodes, so nodes needs to be 1 , and snakemake always just runs one task per job, so ntasks also stays at 1.
Attention: Be aware that ncpus should match the threads directive in the respective rule. If ncpus is less than threads snakemake will reserve only ncpus cores, but run the rule on the number of threads specified with threads . When running on the Iris cluster, the value for both should not exceed 28, the number of cores on a regular node.
Run snakemake with cluster configuration
Make sure you quit your job and run the following from the access node.
Now we need to map the variables defined in cluster.yaml to the command-line parameters of sbatch. Check the documentation on the HPC website for details about the parameters.
The meaning of the option -j changes when running in cluster mode to denote the maximum number of simultaneous jobs.
(node)$> exit
(access)$> cd $SCRATCH/bioinfo_tutorial
(access)$> conda activate bioinfo_tutorial
(access)$> snakemake all --delete-all-output

(access)$> SLURM_ARGS="-p {cluster.partition} -N {cluster.nodes} -n {cluster.ntasks} -c {cluster.ncpus} -t {cluster.time} -J {cluster.job-name} -o {cluster.output} -e {cluster.error}"

(access)$> snakemake -j 10 -pr --use-conda --cluster-config cluster.yaml --cluster "sbatch $SLURM_ARGS"
Let's have a look at the jobs that were submitted:
# only job allocations
(access)$> sacct -X --name="mapping","peak_calling","bigwig" --format JobID%15,JobName%15,AllocCPUS,Submit,Start,End,Elapsed

# including all steps
(access)$> sacct --name="mapping","peak_calling","bigwig" --format JobID%15,JobName%15,NTasks,AllocCPUS,Submit,Start,End,Elapsed,MaxVMSize
Check the submit and end time to see which jobs were running at the same time and when snakemake waited for jobs to finish.
After this step you should see a bunch of slurm-XXXXXX-<rule name>.out and slurm-XXXXXX-<rule name>.err files in your working directory, which contain the (error) logs of the different snakemake rules.
Inspect results in IGV
Now that we have completed the workflow, let's have a look at the results.
For visualisation, download IGV, or use any other genome browser of your choice.
To copy the results from the cluster to your laptop, run the following in a local terminal (Linux and MacOS) or a MobaXterm local session (Windows) and replace <your_username> with your ULHPC user login. For alternative ways to transfer files, see the documentation on the HPC website. Pay attention in which directory you are, so you can find the files again.
(laptop)$> mkdir bioinfo_tutorial
(laptop)$> cd bioinfo_tutorial

# check where you are
(laptop)$> pwd

# transfer the output directory
(laptop)$> rsync -avz --rsh='ssh -p 8022' <your_username>@access-iris.uni.lu:/scratch/users/<your_username>/bioinfo_tutorial/output .
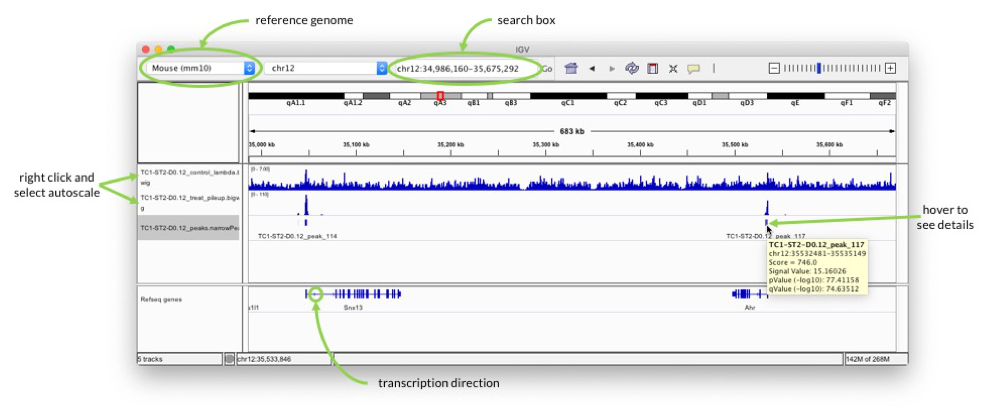
Start IGV and select mouse mm10 as genome in the drop-down menu in the upper left. Go to "File" -> "Load from File…" and select all three files that you have copied from the cluster.
In the search box enter for example "Ahr" to check the signal around one of the genes highlighted in the paper.
Pay attention to the scale on which the two coverage tracks are shown. You can right-click on the track name on the left and select "Autoscale" to adjust the range.
When you hover over the blocks in the TC1-ST2-D0.12_peaks.narrowPeak track, you can see additional information about the called peaks, e.g. p-value. The peaks should be at the transcription start sites, because that is what H3K4me3 marks. Pay attention to the arrows in the "Refseq genes" track to see in which direction transcription goes.
(Optional) Immediately submit all jobs
Snakemake has an option to immediately submit all jobs to the cluster and tell the scheduler about the dependencies so they run in the right order. It submits the jobs one-by-one, collecting the job ID of each from the Slurm output, and then forwards those job IDs as dependencies to the follow-up jobs.
Unfortunately snakemake doesn't parse the job submission message from Slurm cleanly, so the dependency lists look like 'Submitted', 'batch', 'job', '374519', 'Submitted', 'batch', 'job', '374520' instead of being just a list of the job IDs. Therefore, we need a wrapper script to get the dependencies right.
Create a python script called immediate_submit.py with the following content:
#!/usr/bin/env python3
import os
import sys

from snakemake.utils import read_job_properties

# last command-line argument is the job script
jobscript = sys.argv[-1]

# all other command-line arguments are the dependencies
dependencies = set(sys.argv[1:-1])

# parse the job script for the job properties that are encoded by snakemake within
job_properties = read_job_properties(jobscript)

# collect all command-line options in an array
cmdline = ["sbatch"]

# set all the slurm submit options as before
slurm_args = " -p {partition} -N {nodes} -n {ntasks} -c {ncpus} -t {time} -J {job-name} -o {output} -e {error} ".format(**job_properties["cluster"])

cmdline.append(slurm_args)

if dependencies:
    cmdline.append("--dependency")
    # only keep numbers in dependencies list
    dependencies = [ x for x in dependencies if x.isdigit() ]
    cmdline.append("afterok:" + ",".join(dependencies))

cmdline.append(jobscript)

os.system(" ".join(cmdline))
Besides the dependencies this script now also takes care of all the other Slurm options, so you don't need to define SLURM_ARGS anymore in the shell.
Make the script executable:
(access)$> chmod +x immediate_submit.py
Run snakemake with the following command and replace <your_username> with your ULHPC user login:
(access)$> snakemake all --delete-all-output
(access)$> snakemake --cluster-config cluster.yaml -j 50 -pr --use-conda --immediate-submit --notemp --cluster "/scratch/users/<your_username>/bioinfo_tutorial/immediate_submit.py {dependencies}"
With squeue -u <your_username> you can check the status of the submitted jobs and see when they all have finished.
(Optional) Revert the changes to your environment
Unset PYTHONNOUSERSITE
Remove PYTHONNOUSERSITE=True, so python finds the packages in your $HOME/.local again:
- Open
~/.bashrcin your favourite editor (e.g.nanoorvim). - Scroll to the very end of the file.
- Remove the line containing
export PYTHONNOUSERSITE=True.
Remove conda
If you want to stop conda from always being active:
(access)$> conda init --reverse
In case you want to get rid of conda completely, you can now also delete the directory where you installed it (default is $HOME/miniconda3).
Useful stuff
- To avoid too much overhead in the number of jobs submitted to Slurm, use the
groupdirective to group rules that can run together in a single job. - If your workflow runs for longer than just a few minutes, run snakemake inside
screenor prefix it withnohup. This prevents the workflow from stopping when your SSH session get's disconnected. - If
PYTHONNOUSERSITEis set, Python won’t add theuser site-packages directorytosys.path. If it's not set, Python will pick up packages from the user site-packages before packages from conda environments. This can lead to errors if package versions are incompatible and you cannot be sure anymore which version of a software/package you are using.
References
- Köster, Johannes and Rahmann, Sven. “Snakemake - A scalable bioinformatics workflow engine”. Bioinformatics 2012.
- Gérard D, Schmidt F, Ginolhac A, Schmitz M, Halder R, Ebert P, Schulz MH, Sauter T, Sinkkonen L. Temporal enhancer profiling of parallel lineages identifies AHR and GLIS1 as regulators of mesenchymal multipotency. Nucleic Acids Research, Volume 47, Issue 3, 20 February 2019, Pages 1141–1163, https://doi.org/10.1093/nar/gky1240
- Langmead B, Salzberg S. Fast gapped-read alignment with Bowtie 2. Nature Methods. 2012, 9:357-359.
- Zhang et al. Model-based Analysis of ChIP-Seq (MACS). Genome Biol (2008) vol. 9 (9) pp. R137
Acknowledgements
Many thanks to Aurélien Ginolhac, Cedric Laczny, Nikola de Lange and Roland Krause for their help in developing this tutorial.